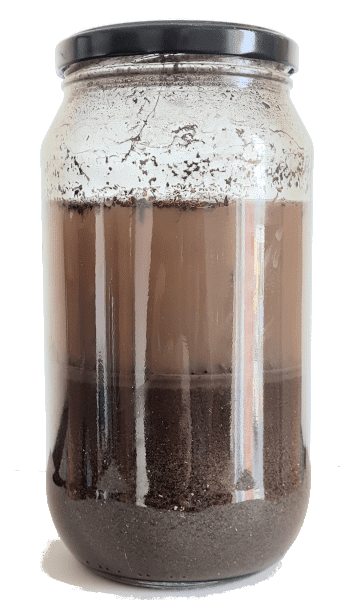
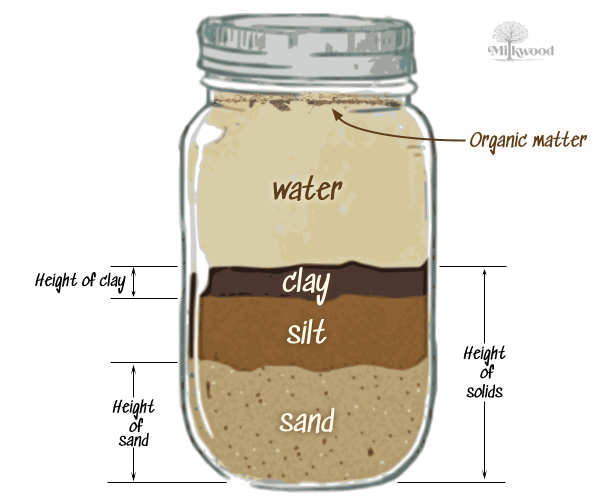
A DIY method to figure out the basics of your own soil

You will sometimes hear gardeners refer to their soil type as a ‘sandy clay’ or as a ‘silty clay loam’ or maybe even just as a clay… but what exactly do they mean?

Well, they are referring to their soil texture – but each of these terms have very specific meanings. They are determined based on the make-up of the mineral particles in your soil – the ratio of sand, silt and clay.

Here’s a DIY method to help you figure out the basic ratios of your own soil, plus an easy-to-use calculator we made, so you can determine exactly what texture YOUR soil is.

This soil toolset is part of our workshop How To Build Healthy Soil for Your Best-Ever Veggies – check out the full video and all the resources here.

Step 1: The Jar Test

Alrighty, let’s get started. Grab a jar and a bit of your soil – it’s time to do a jar test! This is a rather easy test that you can do to determine your soil texture.

First off – here’s the bit of the workshop where we explain how to do this…

Now, conduct your Jar Test…

Make sure you take your soil sample for this test from the root zone of your plants – not the very top of the surface. This will give you a more accurate result.

Jar with dispersive clay soil sample


You will need:


  • A large glass jar
    • Approximately 1 litre / 1 quart in size
    • With straight sides and a tightly fitting lid
  • Enough of your soil to half fill the jar
    • Collect it from approximately 50 to 150mm / 2 to 6 inches below the soil surface
    • Remove any pebbles or large pieces of organic matter
  • Enough clean water to fill the jar
  • Some dishwashing liquid / liquid soap


Method:


  1. Fill the jar about half full with your soil.
  2. Top up the jar with water, but leave a little space at the top.
  3. Add a little dishwashing liquid, a single drop will do.
  4. Put the lid on tight and shake for 3 minutes.
  5. Allow to stand overnight.
    • The solids will separate from the water
    • And organic matter will float to the top
    • Sand settles to the bottom first
    • Then the silt settles
    • Finally (and it may take a day or so) the clay should settle out too (if it doesn’t and your water remains cloudy like in the photo to the right, you may have a dispersive clay soil)
  6. Measure the total height of the solid material in millimetres (mm) and record that number.
  7. Measure the height of the sand layer and record that number.
    • You can tell where the sand layer stops because sand particles will be clearly visible.
    • Ignore the different colours in the diagram below: clay, sand or silt can each be any shade of brown.
  8. Measure the height of the clay layer and record that number.
    • You can tell where the clay layer stops because clay is so fine it will form a solid coloured block.
    • Be careful – you may have multiple types of clay of different colours; if you can’t see any texture at all, it is clay. Measure the total height of ALL the clay.
  9. Enter the three numbers you have recorded into our Milkwood Soil Texture Calculator below.


A graphic of a mason jar half filled with garden soil and topped up with water. The soil has settled into seperate layers of sand, silt and clay.

Step 2: The Milkwood Soil Texture Calculator

This calculator is based on the USDA’s soil texture triangle. They have a calculator too, but you need to calculate your own percentages. So we made this super-easy-to-use calculator tool below, to make it easier for you.

Now – enter the measurements you took during your Jar Test into the orange boxes in the calculator below. This will calculate the percentages of sand, silt and clay in your soil.

Once you’ve done that, a red dot will magically appear on the triangle below, indicating your specific soil texture type!

Hooray! You’ve just learned a heap about your soil type and texture. For info on what to do with this new knowledge, head to the resources below.

This soil toolset is part of our workshop How To Build Healthy Soil for Your Best-Ever Veggiescheck out the video and all the resources here.

Got any questions? Ask them in the comments on the link above, and we can help you out. Best of luck with creating amazing soil!