
A wicking bed is an excellent technique for growing things in environments where water is scarce.
It’s got two main parts: the bottom half is a contained reservoir filled with gravel and water and the top half is filled with soil, mulch and plants. By periodic flooding of the deeper half of the bed, mature plant roots get a big drink.
And because it’s contained, that water gets a chance to ‘wick’ upwards into the soil, hydrating the soil of the bed and the smaller roots within.
Pretty simple, really, but amazingly effective, very water efficient and ripe for endless variation.
Below is a photo essay outlining the process of creating a wicking bed using everyday tools and materials, which took 5 people about 4 leisurely hours to make.
It features the efforts of our awesome PDC students in Alice Springs earlier this year, led by Nick Ritar who also designed this particular wicking bed system..
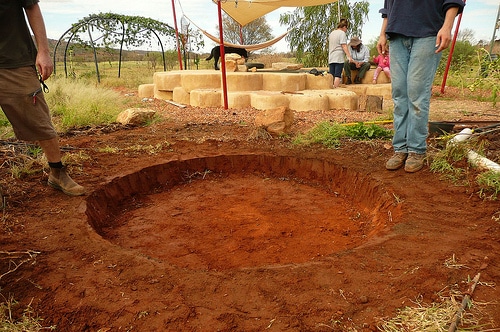
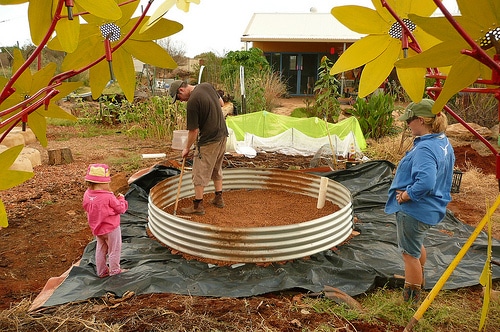
The first step is to create the reservoir which will hold the gravel and the water.
This bed shape and size is based on the footprint of a watertank, a strip of which we’d found to use for the sides of the bed. Make the reservoir around 30cm deep, regardless of the size or shape of your bed.
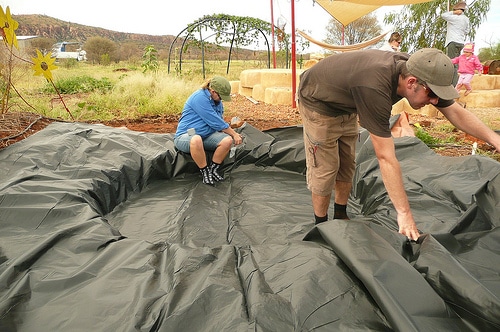
To make a ‘closed wicking bed’ like this one, you want the reservoir to retain its water for as long as possible. We used builders plastic to line the reservoir.
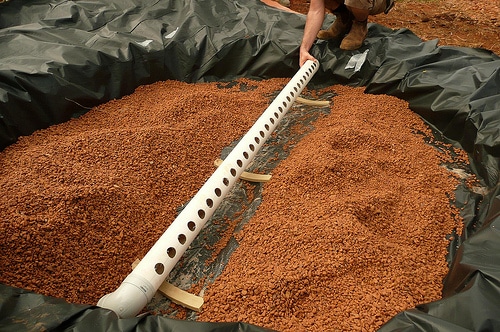
Here is the water pipe that will deliver the water to the reservoir. The line of holes will be positioned facing the bottom, so that plant roots do not enter the pipe.
The water pipe sits on three chocks to create a space between the holes and the ground, so the water can get out of the pipe and fill the reservoir.
A vertical section will be added to the water pipe via the elbow at bottom left. The pipe is closed at the other end.
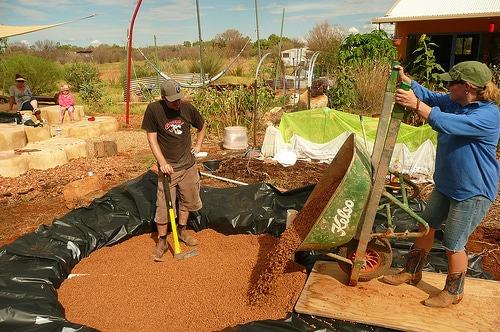
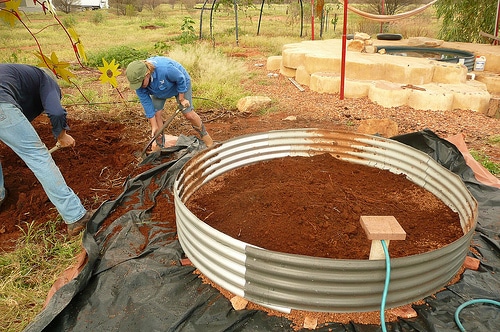
The reservoir is now filled up with gravel, covering the water pipe’s horizontal section.
The gravel in a wicking bed reservoir is there to provide a structure for the soil to sit on top of while coming into contact with the water below.
The next step is to put the walls for the raised part of the bed on top of the reservoir.
Where the reservoir ends and the bed begins, it is crucial to have an overflow. This means that, if the reservoir over-fills, the water has an escape point before it waterlogs the soil of the bed (and kills all the plants within).
In our design we created a simple overflow by raising the iron for the bed surround on pieces of clay pipe, which created a gap of about 3cm between the plastic and the bed surround above.
The gravel was then raked over this gap so that soil will not escape in the event of overflow.
Now, if the reservoir over-fills, the surplus water will seep out of the bed at this overflow point and into the surrounding garden, saving the plants in our wicking bed.
And now for some soil, to a depth of about 30cm. You can see the hose going into the vertical section of the waterpipe (with a paver on top of it), filling up the reservoir for the first time.
The plastic surrounding the bed will be covered with gravel and provide a weed-free barrier around the bed which doubles as a path. And also won’t turn into a muddy swamp when the bed overflows.
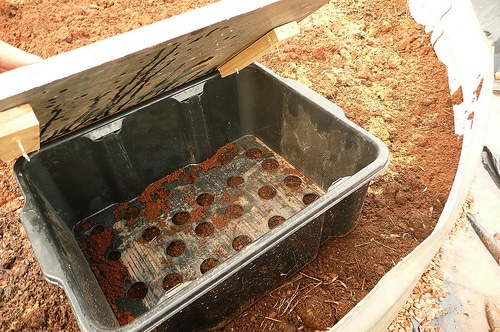
And for a passive fertiliser system – an in-garden worm farm! The worm juice and castings from this small system will leach out into the bed through the holes in the bottom of this box, fertilising the plants.
A small proportion of worm juice may make its way down to the reservoir and mix with the water, further enhancing the biological relationships that will keep this bed’s soil humming.
A small but important task to make this bed serviceable – making a top rim out of old hosepipe which fits over the sharp edge of the corrugated iron that the bed surround is made from.
Otherwise planting and harvesting in this bed could be a painful business.
Topsoil all in, a heavy mulch of pea straw is applied to keep the moisture in the soil where we want it.
The small square in the bed is the lid of the waterpipe, and the larger rectangle is the lid of the in-garden worm box.

\
The inlet of the waterpipe serves two functions – firstly, you can fill the reservoir of your wicking bed – by bucket, hose or other water source.
Secondly, this inlet hole allows you to see the level of water in the reservoir below, and so to accurately gauge whether your wicking bed needs more water added.
A lid is a good idea to prevent evaporation and to keep your waterpipe clear of leaves, mosquito larvae and any other visitors you might not want in your system.
And there you have it – one completed wicking bed (with in-garden wormfarm)! The bed is now ready for planting a bunch of water-loving vegies which would be otherwise hard to grow in the dry climate that is Alice Springs.
The property owner has promised us photos in due course on how the wicking bed vegies go, so we shall report back. But isn’t it a brilliant system? We ‘re in love with its efficiency and simplicity. Thanks, team!


I am considering putting in a wicking bed system and am concerned about the plastic sheet leaching chemicals into the water.
Is this an issue and are there any alternatives?
Cheers
hi catherine kingshott! its nicky warner here!!!
we are making a wicking bed all the way in alice springs! its a lot of work! will tell you how it goes
miss you !!!
I also am planning to put in some wicking beds and have the same concerm as Catherine, with the plastic leaching chemical from the plastic.
I also am wondering what stops the soil from mixing with the gravel. Can one use shade cloth to separate the gravel and soil as I’ve seen elsewhere?
In rain gardens like this a geotextile fabric is usually used to stop the soil moving down into the gravel layer to stop clogging.
Just wondering how you incorporate an overflow system for heavy rain events to stop water logging and root rot?
…Russ
Hi Russ, Yep, the overflow is very important – look at the 7th image down and text above image: “In our design we created a simple overflow by raising the iron for the bed surround on pieces of clay pipe, which created a gap of about 3cm between the plastic and the bed surround above. The gravel was then raked over this gap so that soil will not escape in the event of overflow. Now, if the reservoir over-fills, the surplus water will seep out of the bed at this overflow point and into the surrounding garden, saving the plants… Read more »
… I missed the first time reading. You put the raised bed above the gravel bed for overflow.
…to pick up russ’ other question – in this design no geotextile to stop the soil clogging up the gravel?
any reason for that?
brilliant tutorial kirsten!
xLucas
Hey Luca – um, no real reason – we didn’t think about it at the time… it might be well worth the addition?
goodo!
i’m talking to my mum in perth about converting her backyard concrete fishpond (1m wide by 3.5 metres long by 80cm deep) into a wicking bed for vegies. we were debating the “geotextile or not” thing.
in terms of her getting fully behind it, it’d be great to be able to show her some clear explanation of how “wicking” (the capillary action thing) actually occurs.
in the absence of finding something really conclusive on the web so far, she’s agreed to try a mini-experiment of the whole process in a 10 litre bucket before committing her fishpond…
oh wow – have you considered an aquaponics system instead? if you’ve already got the pond…and there are multiple good aquaponics crews in perth… sorry to complicate things…
i think aquaponics is a step too far for mum. she seemed pretty pleased to get rid of the pond, its koi carp and the pumps. vegie patch first!
What a great article. I have seen in other sites the use of pea gravel for the water storage area, but it appears the poorly sorted gravel you use would be better at wicking water up to the soil. Would it make sense to have ridges and valleys in the gravel, cover with landscape fabric, then apply the soil so that parts of the soil in the valleys are saturated, allowing for better wicking effect? Especially if the rocks in the water storage area do not wick water well.
Hi, Thanks for the article. The issue with the plastic has been solved by some people by using bentonite clay for lining the reservoir.A natural volcanic clay, many kitty litters are 100% bentonite clay.It contains beneficial minerals in fact. You mix it into the top few inches of soil of your reservoir pit. Its got to be damp soil . Then you pound it to create a sealing layer. Have heard it is working for some. I did a several miniature pits but couldnt make them hold water for long. In one experimental pit I used clay from the back… Read more »
Cheers Bee – great tips. BTW we have a new favourite Wicking Beds article, by Rob Avis. Have a look at it here: http://www.energybulletin.net/stories/2011-05-31/bottom-diy-guide-wicking-beds
If the pipe is large enough – put a ping pong ball in it for easy visual reference of the water level. 🙂
nice one…
Very helpful article, thanks. I also want to construct circular wicking beds and this is the only website I’ve found demonstrating that. I’ve been wondering about the pipes in the reservoir. I thought it might be necessary to construct an x-shape (with 3 ends blocked off) to make sure it’s evenly distributed around the bed. But perhaps that would be overkill. I’d like to know if the owner of this wicking bed has any feedback about the success of the design? Do plants situated on the outer sections of the bed do as well as plants closer to the distribution… Read more »
Hi Kate, no we didn’t find that there was much difference in moisture distribution when using gravel… if you were using a finer medium that wouldn’t necessarily distribute the water so well this might be the case though?
I think I have found a viable alternative to PVC: EPDM.
Ethylene propylene diene (EPDM) type rubber is recommended by the Danish Environmental Protection Authority as an alternative to PVC.
EPDM is reusable, recyclable, and has better environmental impact profile than PVC. It is available in custom cut sizes as pond liner for water gardens at many garden centres and is available online at most pond supply places.
Here is an example of an online retailer selling EPDM lining:
http://creativepumps.com.au/zpumps/pond_liner/clearpond_epdm_liner/ozliner_epdm_liner.htm
Andrew
Interesting info, Andrew! Thanks!
Pond liner is more durable and since ponds support plants and fish may be more eco conscious.
Good point, Darrell – should look into that one…
Thanks for showing your design. I’ve learned that placing used carpet beneath the EPDM liner (also repurposed from a pond deconstruction) serves to protect the liner from punctures that occur with wear and tear over time. Having an impervious liner last a long time is essential to avoid having to start over. I’m in the process of designing a seasonal creek bed and bog using the wicking system and incorporating a flow system that can be diverted to runoff during our infrequent rains in Austin. We’ll plant veggies and ornamentals along both sides of the ”creek” to take advantage of… Read more »
Regarding the soil mixing with the gravel without some form of barrier question, it’s not a problem. Once the soil is sitting on top of the gravel it doesn’t mix for reasons I don’t fully understand. But, I’ve dug up plenty of old aggie drains (up to 100 years old), and the gravel is still sitting there beneath/surrounding the pipe with the soil sitting on top. One of nature’s counter-intuitive surprises. I suspect it could be a density thing…I dig the soil in my garden beds twice a year, and without fail the heavier clay is back down the bottom… Read more »
We are looking at building 2 wicking beds for vegies and herbs in above ground iron tanks. There are 2 things that we need some suggestions for… The first issue, the tanks are 90cm high and so we need some way to fill up the bottom 30-40cm underneath the water reservoir and not sure of the best way to do this… The other question, we have a heap of yellow brickie’s sand left over from the paving and were wondering if this is ok to use as a medium for the water reservoir or is the ‘yellowness’ a dye that… Read more »
Hi Melanie, yes you’ll have to waterproof the reservoir layer… with plastic or similar. Re the sand, that yellow color would likely be an oxide of some sort, so not too big a deal I don’t think (but ring the supplier and check if you can?) – good luck!
Queries about using a cloth over the stones and pipe to prevent soil mixing in, i just used old polyester curtains, the ones that have a very tight and very fine weave and they’ll need to be a man made fibre (polyester) so they dont biodegrade 😀 i think the material is a chiffon or something similar…..
I also use this material on my seedlings….it keeps out vermon,snails, possums and lets in the rain and sun! You can gets heaps of it at the Op shop!
What is the ideal size of gravel for a wicking bed? Can one use 3/8″ gravel or is this too fine?
Cheers guys…this is a really great series of instructions that will enable me to plot all of this in AutoCad and share it with my lecturer 🙂
I have made six different wicking beds.one was in ground as in the above article.and the rest above ground.instead of gravel I have used compost and in two beds biochar and rock dust was added to the compost. This was to a depth of 150mm above this I added good garden soil to a depth of 300mm I. did use the compost worms for 1 yr but they got hungry, so I moved them to a farm closer to the house.They did very well in 2 milk containers with multiple holes and the top cut and hinged to act like… Read more »
Wonderful Ideas from across the globe. I have a slanted yard (in more directions than one). We are putting in a tiered garden next year and I thought it would be useful to incorporate a system like this into it. We will be using landscape boards to build up from the ground with minimal digging. I think it’s possible to then line each section of the garden with plastic and place the watering pipe in each bed. Thanks for the ideas!
I have made a few self watering vegetable planters from polystyrene boxes, and I have had some success, mostly with salad greens. I used potting mix and supplemented with organic fertilizer pellets. I now want to make more permanent wicking beds like yours, and I wondered if you could update us as to what changes you would make, and whether you have had any problems with the soil getting too compacted? Thanks heaps.
Hi Christine, our wicking bed is 18 months old and going really well. Its a level pit lined with plastic , filled with wood chunks and gravel with slotted fill pipe buried in the aggregate. All this is covered with shade cloth, and a sleeper box placed over top and filled with damp soil and compost. Would and are about to do it again exactly the same.You can see how it was done in photos on http://www.merribeeorganicfarm.net.au . More info is in Bees Blog on home page.Good luck.
Thanks for that reply. I had a look at your site and the wicking beds look a treat. I wish I was closer so I could come for a look. What have you found that you can’t grow in them? Do some vegetables need more depth for their roots?
No, everything we ‘ve tried has gone well. It is pretty deep soil …..about 400 mm, and I grew a parsnip in there that was as long as that and perfect. As I say, only trouble with them is you have to water so infrequently that you might forget to.
Very impressed about the parsnips. I have heard that they are not the easiest thing to grow. One last question. Did you import soil for the beds or use local stuff and feed it up?
I make my own compost Christine and just mixed it with the topsoil removed from the pit.
Hi Milkwood crew, we’ve recently taken the idea of the wicking bed and made it mobile based on Nick’s ideas at last October’s Mudgee PDC of using an IBC container. The only difference is that we’ve built them purely for native plants as we are a conservation not-for-profit. It means that we can build the gardens in one location with one group of people and deliver it to another group of people… a great way to connect people with money and time to those in need of gardens like schools with no grassed area! The first one was close to… Read more »
Well done! Awesome! You could consider vermiculite for the veggie versions also (if you go that way)?
you may want to put neem oil in the watering to stop mosquitos – or are they not a problem …. I’m wondering does neem oil kill earth worms and other insects and microbes ?
Loving this idea. Did you use any particular soil mix? Our soil does not look as good as yours. Should we mix it with anything to loosen it up?
Thanks for a great article, we’ve been using a smaller bought version which works well. This is how we can build a much larger one.
Fantastic tutorial. I’d like to know how this bed’s working out a few years on, particularly the worm bin. Do you have any recent photos?
We are in Alice Springs but we don’t have rainwater – will these beds work with normal Alice tap water??
Has anyone else used socked agi pipe, and done away with the gravel layer? I have had success with wicking beds using socked 65mm Agi-pipe and with good sandy loam all the way down. I pour bokashi down the inlets when I first add water and have had no problems with ‘sour’ soil.The sock around the 65mm drainage pipe stops soil from infiltrating, allowing you to do away with the gravel and geotextile layer. Instead of drilling drain holes I hole-saw a single 65mm drain hole centred about 160mm minimum above ground level and run unslotted pipe through and connect… Read more »
Hi Brett..
I use the socked ag pip in a few different styles of wicking beds… Works great in the wicking barrels & have also used it in a wicking IBC bed.. The next large bed I build will have a spiraled length of it in the base.. Haver posted a few clips on our YT channel if interested..
Have you tried leaving out the gravel layer all together and just using soil all the way down? I make mine this way and then innoculate with heaps of bokashi. This replaces the methane producing bacteria with bacteria that anaerobically ferments the biological material in the soil while also pulling nitrogen from the air and turns it into liquid plant food. This turns what is normally a problem (anaerobic soil going sour) into a solution. I have been trialing these socked agi pipe/soil only/bokashi wicking beds for a year now and the growth rates are better than standard wicking beds.… Read more »
Hi Brett, I have been experimenting with wicking beds, boxes, pots and so on for several years. I started using gravel, and then found that many of my plant roots went straight through the geotextile and ended up in the gravel reservoir anyway – something I’d been told the geotextile would prevent. Anyway, I figured if the roots grew well in the reservoir (I had been using 7 to 10 mm gravel, so the water would wick up through the reservoir as the water levels dropped) then as long as I used decent, friable soil, then wouldn’t the plants appreciate… Read more »
Hi fellow soil-only wicker. My lowest soil-only beds were also 400mm high, built from sleepers. This is a good height to put another sleeper on horizontally as a seat, which takes it to 450mm high. My deepest soil-only wicking bed is 800mm deep and has a thriving full sized avocado in it. For bananas, papaya and citrus about 600mm seems deep enough and they do better here in the dry tropics than in a banana circle. You should consider getting some of the MAZE liquid bokashi from Bunnings (it is the VRM stuff just relabelled), and get some of those… Read more »
Hi Brett Your ideas about deeper beds or bottomless beds are very interesting. I’d like to hear more, especially how your fruit trees are doing in these beds and how you build those. We are on a sloppy rocky sandy hill with almost no water, other than drops we collect from rain – this is inland SA – hot, dry. Wicking systems seem the only solution for us to grow anything given how poor our soils are and the lack of water. We have just build 2 wicking beds from sleepers, with the socked pipe surrounded by sand, then geotextile… Read more »
I found with the deeper beds you do need to water from above and below. I do this with all my biowicked beds, partly as I also want to saturate the mulch layer at least once a week to help it decompose. A thick mulch layer plus regular watering from above can above stop your wicking beds from salting up, which can happen if they are only watered from below and that water is escaping through evaporating off bare soil. I also mulch well as in a hot climate up to 3/4 of your nutrients can be provided by that… Read more »
Hi Brett, Just a question about the MAZE bokashi liquid. We’ve just had a couple of wicking beds go anaerobic (story above if you’re interested). Anyway, I’ve flushed them out and emptied them as best I can (can’t get all the water out unfortunately) but I’m hoping to get the anaerobic nastiness fixed so I don’t have to dig out the soil and do a permanent fix until next planting season. I’m wondering if adding some maze will help? Or even just some worm farm juice? The question is, do I dilute the maze and add it to the soil… Read more »
I use a liquefied food waste inoculated with the VRM liquid bokashi, and use that undiluted. I also brew up wicking bed inoculate from the VRM bokashi and add mineral rock dust and organic inputs such as seaweed extract and blood and bone etc. The fermentation process chelates the minerals and pulls all the nutrients into liquid form. I then pour this liquid undiluted over the lower third of the soil when filling my biowicked soil-only wicking beds, after thoroughly saturating the soil. The purple non-sulphuric photosynthetic bacteria in the bokashi-based microbial mix replaces methane producing bacteria in the lower… Read more »
Hey Brett..
I missed your response to my post above sorry mate.. Am very interested in trying some sand less barrels out to see how they go.. Do you have a post somewhere explaining amounts & how the soil interacts with the VRM?
Starting to get the warm weather garden sorted & would really like to have a crack in a few barrels & do a comparison between the 2..
Cheers mate..
I just cut up my first blue barrel last week and started experimenting. I’m doing one with heaps of compost and organic matter in the lower layer instead of soil to see what happens when it interacts with the bokashi ‘tea’. Half a barrel is 47cm which is perfect for veggies, so you can get two from one barrel if it has the screw in lids. Ones without lids could have the top 24cm or so cut off and be used for bananas and fruit trees. After cutting the drum exactly in half I put the drain about 10cm up… Read more »
I have just finished building 6 wicking beds made from 3 ibc bulk containers cut in half. It has worked a treat! I used some silastic to seal up the taps and the lids etc on the containers and then put my pipe in followed by the gravel and some broken bricks etc. I got some second hand carpet (courtesy council pick up) and used that for the wicking layer. I also used a few bits of hessian bag for the ‘gaps’. The top growing bed was filled with some good quality mix from the local nursery. Mostly organic stuff,… Read more »
I’m building my first w/bed using old timber palates. Have done heaps of research on the idea and many great Ideas have been written about.my problem though , is, EXACTLY where the water flow outlet should be located. Seems the usual advice is to place it between the reservoir ( gravel) and the soil. So, does this mean that it should rest on the soil or the gravel ? What if the soil gets wet? Can someone please explain this a little more clearly for me?
Thanks heaps in anticipation.
Garry
I doubt this helps so late in the game but it may help some one else. Generally it is in between the levels resting on the gravel but you can also do it on the bottom and put an unglued elbow on it with a length of pipe and have an adjustable water level which is what I prefer and if you do that it can also be the way you put water in the bed. The elbow allows you to raise the water level into the soil to help start seeds or cuttings or completely drain it to wash… Read more »
Could I use an old bathtub?
regards
Mel
yep, you could – you’d want to drill a hole in the side for the overflow outlet though
We’re half way through building a pair of wicking beds, 1.7m x .7m x .6m high. We were planning to go the conventional scoria/gravel approach for the reservoir, then read the comments below about this being over-engineered etc. We considered using the soil only technique but I’m a bit worried about the soil turning into a skanky mess down there. Also, as our beds are quite high we’d need to buy more soil to fill them. Today we were at a salvage yard and saw a big pile of bread trays and it occurred to us that we could use… Read more »
sounds like a great idea. Don’t cover the entire of the bottom of the reservoir with bread trays allow some columns of soil to get all the way to the bottom of the reservoir to act as wicks. As long as you have worms in there it won’t go anerobic.
Thanks for the reply Nick. The bread trays don’t perfectly fit the beds so there will be some gaps. We were thinking of letting soil go down the gaps to the bottom but apart from the anaerobic problem (easily solved perhaps) we were concerned that the water couldn’t wick that far. Everyone seems to agree that soil can only wick water about 30cm. Our soil layer above the bread trays will be 30cm. Soil down to the bottom of the reservoir would be 60cm below the surface. Do you have any thoughts on this? Our current plan is to fill… Read more »
I assume the worms prevent anaerobic conditions primarily by aeration, and perhaps by consuming anaerobic microorganisms. is there another factor as well?
As far as I can tell worms also have access to some kind of dark magic that keeps things aerobic 🙂
So, an update on our media-less wicking beds. A month or so after completing them using the technique described below, our veggies have been looking miserable. We planted a combination of seeds (carrots and spinach) and seedlings (spring onion, cauliflower, silverbeet and beetroot. Only a few spinach have come up, and the carrots are slowly appearing. The spring has hardly grown but seems healthy enough. The silverbeet are miserable and some have even died. The cauliflower are trying to grow heads already despite being tiny. The beetroot aren’t too bad but have hardly grown. At first we wondered if it… Read more »
Bokashi food composting relies on anaerobic bacteria that pulls nutrients out of food waste without creating methane. I discovered that by using a bokashi-based biofertiliser to inoculate the lower layer of a wicking bed I could do away with the sand/gravel layer and just use soil all the way down. In addition to stopping methane production, the same way as it does when applied to anaerobic food waste, the bokashi bacterial mix inoculates the anaerobic soil with beneficial purple non-sulphuric photosynthetic bacteria that utilises infrared light to fix atmospheric nitrogen. This nitrogen is converted by other bacteria into a form… Read more »
Thanks Brett. Interesting to read an explanation of how a soil only wicking bed can work – I had wondered how it avoided becoming a stinky mess. A couple of things I wondered though: – How long does the biofertiliser inoculation last? Do you have to dig it out and re-inoculate at some stage? Or can you add it from the top? – Most people seem to agree that soil can only wick about 30cm. How deep is your soil layer? Our beds are doing better now. Apparently that the problem was as much to do with the poor quality… Read more »
this is indeed great – i am in the middle of making a similar wicking bed in a greenhouse ,still have to install the overflow – used flexible perforated plastic tubes (french drain ) and covered most of the bottom with it – what is the maximum height of the soilmix for sufficient wicking.
revert when completed .
Hiya William – there’s no one answer to that, but have a look through the documents of Colin Austin here, who came up with the wicking bed concept – https://www.waterright.com.au/wicking_bed.htm
I wouldn’t go over 30cm