Why is making a Base Map essential to your permaculture design process? Because its the base template on which you’ll create your design.
A base map is a scale drawing showing the basic, permanent features of your design site. There’s a couple of ways to do it.
A base map is the starting point for a permaculture design, in terms of laying out elements and design features on your design site, as well as site analysis and assessment.
In this article we are assuming that you don’t already have access to a good sized scale drawing of your site.
Scale drawings follow several standards which are worth keeping in mind…
- North is always up
- We use standard scales to make multiplication and division easy, and so we can use a standard scale ruler.
Why make a base map?
- To give a place to record our observations & interpretations of the site.
- To give us a canvas for drawing our concept, schematic and detailed designs.
- To reduce the time we have to spend redrawing the permanent elements of the site
- To provide consistency between the different plans & drawings we are going to present to other people.
- It gives us a not quite “blank canvas” that we can quickly duplicate
- Because we can easily make many copies, it frees up our creativity to experiment and not care so much if we make a mistake.
Choosing a scale
A scale drawing shows a real place with accurate sizes reduced by a factor (called the scale), to allow us to represent real objects and features on a piece of paper.
To choose a scale:
First, decide on the size of the piece of paper you are going to use. We prefer big sheets (A3 or larger) to give us lots of space for jotting down ideas and doodling.
Let’s say you choose an A3 sheet, which is 420mm wide by 297mm tall
– Measure the longest dimension of the site, both north south and east west – you can do this with a tape measure or an online map like google earth
Now, let’s say your site is 12m east to west and 11m north to south. The next thing you need to do is to convert all your dimension to the same units – so lets go with millimeters:
- Page – 420mm x 297mm
- Site – 12,000mm x 11,000mm
The next step is to find a useable scale that you can divide your site dimensions by, to make them less than the page dimensions. By useable scale, we mean a number that is easy to divide and multiply by.
The most easy to use scales commonly occur on scale rulers.
Choose from one of the following numbers: 10, 20, 25, 50, 100, 200, 250, 500, 1000, 2000, 2500, 5000, 10000 (see the pattern?)
SO – in our above example, if we divide our site dimensions by a scale of 25, we get a drawing of 12,000mm ÷ 25 = 480mm wide by 11,000mm ÷ 25 = 440mm tall. This would not fit on our page.
If we divide it by a scale of 100 we get 12,000mm ÷ 100 = 120mm wide by 11,000mm ÷ 100 = 110mm tall. This drawing would be very small on our A3 page
However, if we divide it by a scale of 50 we get 12,000mm ÷ 50 = 240mm wide by 11,000mm ÷ 50 = 220mm tall. This is just right, our drawing will fit neatly on our page with room to spare.
1:50 is a good scale for this base map.
Sometimes our site will be a difficult shape & we will have to make a compromise. For example it might be at a crazy angle to north.
Try to keep north pointing up (or at least with 15 degrees of up). Remember blank space around your drawing is good, it leaves you lots of space later to make notes or add extra information.
Methods of making a base map
There’s a couple of ways you can make a base map:
- Trilateration – the most low-tech, yet still effective, solution
- Tracing an aerial photo at scale
- Using software to make a digital base map
Using Trilateration to Make a Base Map
Trilateration is the process of determining the locations of points by measurement of distances, using the geometry of circles and triangles.
Trilateration is an easy way to survey a small block of land or a back yard. It does not require special training & only requires a few inexpensive tools. Anyone can do it.
Trilateration is often misnamed as & confused with triangulation which uses the measurement of angles to achieve the same result, usually over larger distances.
Tools you will need for trilateration:
In the field:
- A tape measure (20m long is usually enough)
- A sketch pad or grid paper for recording your measurements
- Some drafting pencil or pens.
Back inside
- A nice large sheet of paper to make your base map on
- Some drafting pencil or pens.
- A drawing compass (preferably with an extension arm)
- A scale rule
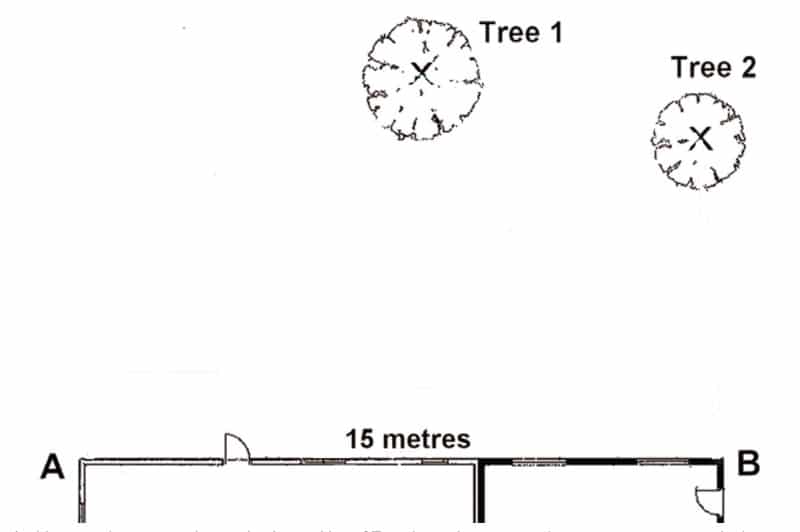
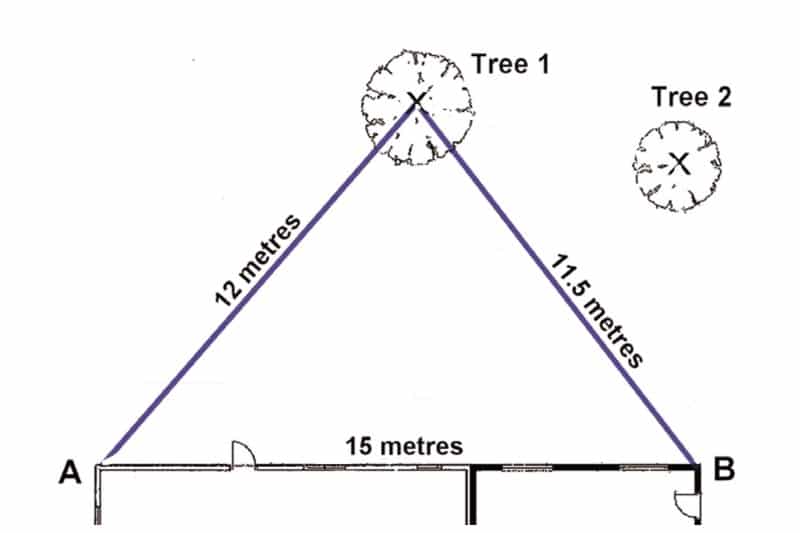
Here’s an example of accurately locating a tree on a base map using trilateration:
Let’s plot the position of Tree 1 on a base map using measurements we take in the field (a back yard, in this case).
The first step is to make a rough sketch of the backyard so you have something to record your measurements on. Grid paper can help you get the scale of your drawing approximately correct.
Once you have made your rough sketch the next step is to choose a baseline.
In this case we will use the wall of the building marked A B. Measure the baseline and write the measurement on your sketch.
In this case, it’s 15 metres.
Next, we use our tape to measure the distance from A to Tree 1 and B to Tree 1 and record those distances on the sketch. In this example the measurements are 12 metres and 11.5 metres respectively.
When base mapping your own project you will repeat this process for any other object you wish to include on the base map.
Measure from point A to the object, and point B to the object and record the measurements on your sketch.
- Using the appropriate edge of your scale ruler ( e.g. 1:50) draw your baseline on to the plan.
- Set your compass to the distance from point A to Tree 1 (12m) on the scale ruler.
- Place the compass’ needle end on A and draw a semi circle across the area where Tree 1 is located.
- Next, set the compass at 11.5m and place the pointed end on B, make a semi circle in the area of Tree 1.
- Where these two lines intersect is the exact point of Tree 1, you can now mark it on your base map.
- Now do that same process with the next feature!
The two images above are from a excellent practical book by Aranya Gardens that we supply to Permaculture Design Certificate students as part of their course.
All immovable objects should be included on your base map.
This includes trees, garden corners, fence lines, clotheslines, paths, ponds etc.
Tracing an Aerial Photo at Scale
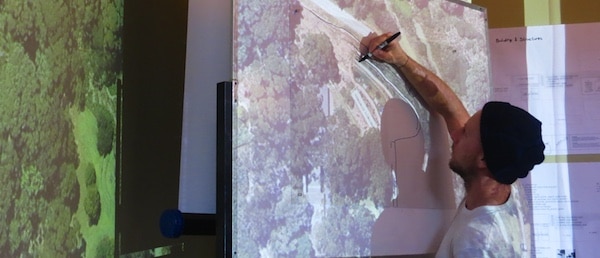
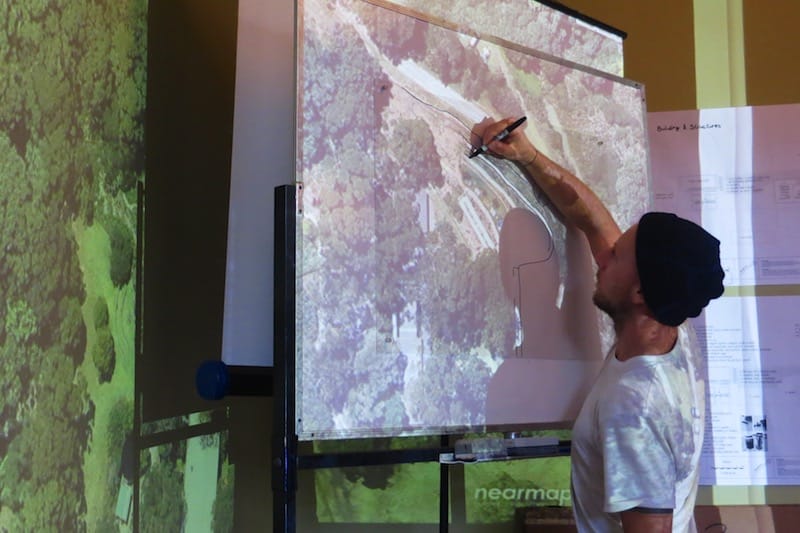
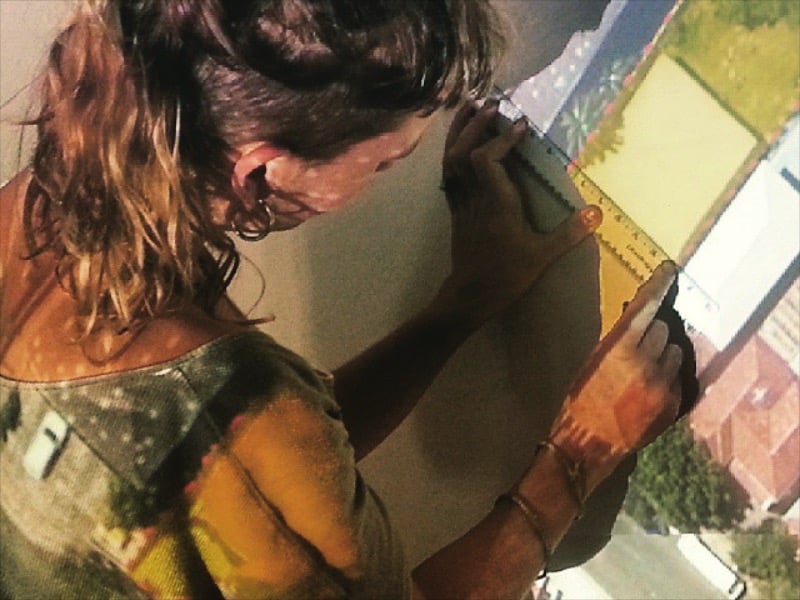
If you have power, the internet and a projector, one of the quickest ways is to project a satellite image or aerial photo onto your paper and trace it. To do this:
- Stick your piece of paper up on a wall
- Choose an image of your site preferably with a scale bar visible e.g in the bottom right of this image
- Set up the projector so the image of your site is projected onto your paper. Make sure the projector is as “square” as possible by setting up the projector at the same height as the paper. Avoid projecting at an angle to the wall. Some projectors have “skew” or “keystone” adjustments to help correct this. The closer you get to “square” the more accurate your projection will be.
- Choose the scale by adjusting the zoom of the projector (or moving it closer or further from the wall) until the site fits on the page AND the scale bar measures “true” on one of the scales of a scale ruler
- Read the scale off the ruler (e.g. 1:50)
- Trace the major features off the projection onto the page.
Creating a Digital Base Map
Another way is to use software on a computer to create a digital base map from a satellite image or aerial photo.
Goodlife Permaculture recently did a great article on how to do this recently using freely available software.
Making Copies of your Base Map
Copies of a basemap are great because they allow your creativity to flow. You can try things out and get them totally wrong (so very important when designing) – and then move on to something that you’re really happy with.
But if you’re designing in the middle of the forest, or somewhere remote, how do you make 10 copies of your base map?
Our best hint on this is trace your base map on a window with your copy overlay – as many times as you need to.
Or, if you’re nearer to such things, you can photocopy your basemap, or scan it it and print it out at a copy shop – but be careful not to change the scale in the printing process.
Congratulations! You have now made a base map. Let the designing begin.
We teach Permaculture Design Courses in Sydney + surrounds to empower people with the skills they need to design a resilient, regenerative futures.
About this Permaculture Design Process article series:
We’re sharing our Milkwood Permaculture Design Process from start to finish – this is the design process we use in our Permaculture Design Certificate.
This article is the second part of the whole – you can view the whole design process here.
We’ve created this design process as a result of interacting with many amazing designer’s work, thinking and processes over the years, particularly that of Rosemary Morrow, David Holmgren and especially Dave Jacke, teacher, designer + author of Edible Forest Garden Design Vol I + II.
While drawing from Bill Mollison’s seminal Permaculture: A Designers’ Manual, we have chosen not to ‘teach the book’. Instead, we have drawn on and adapted the knowledge to create a design process with a firm focus on enabling students to design effectively.
As is the case for all design teaching, we acknowledge that we stand on the shoulders of those who came before us, and that without them, we would not be able to see the road ahead.
We see Permaculture Design as one of the most powerful tools that we the people have, to ensure a resilient + regenerative future for our communities.
All our articles about permaculture design are here…





Great post! I found that I could use our old GPS to make a map, I just had to press “mark” at significant points on the property and then download the map, I spent several hours walking around until I had the whole property marked out. I then used our property boundary map from when we bought the property to trace the marks from the computer screen onto paper and fill in the details of roads and dams etc. It made everything clearer when I saw it on paper. We also had vegetation mapping (for QLD), which shows riparian areas… Read more »
Be careful of the accuracy of GPS, especially elevation information. They can be out by up to 15m vertically.
Thanks for a really useful article. I am trying to do a proper base map of my back yard (I’ve just been using a sketch up to now) but I’m not sure how to handle changes of slope. I have areas where we have dug out and and areas where we have built up soil, making sloping planting areas rather than using retaining walls. These are not consistent in any way, either in slope angle or size. How do I show this on a base plan? If I measure along the ground (ie up and down the slopes) of course… Read more »
Alway measure horizontally so the base map is an accurate top down view of the landscape.
If you have a particular area that is very steep you can zoom in on that area and make a large scale map of that area.
You can also use elevations to convey the slope of the land or a contour map. Examples below
Thanks for clarifying that, Nick. I think I’ll do elevations as well as the base map.
this is not a great way to make a base map, because when you use a projector you’re 99% likely not able to project it with perfect angles. The dimensions on the image can only be reproduced if the projector 1. doesn’t distort the image, 2. is perfectly level, 3. is projecting perfectly horizontally, 3. and is projecting ‘square’ against the surface that is being projected upon. …And the surface that is being projected upon is perfectly perpendicular to the angle of the projection. If any of these angles between the projector and the surface being projected upon aren’t square/level,… Read more »
Good points. I’ve updated the article and added some more info about making sure the projector is as “square” as possible to the page.
That said, our goal is to encourage folks to make the best base map they can… and any base map is better than no base map.
thanks Nick!