
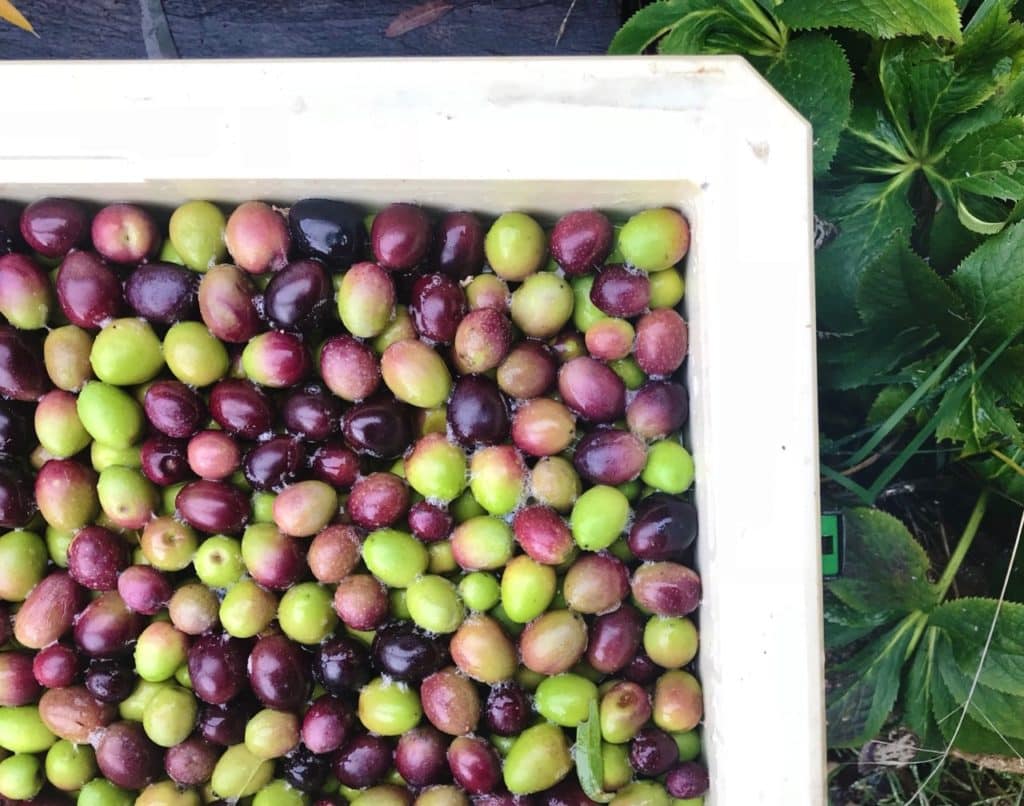
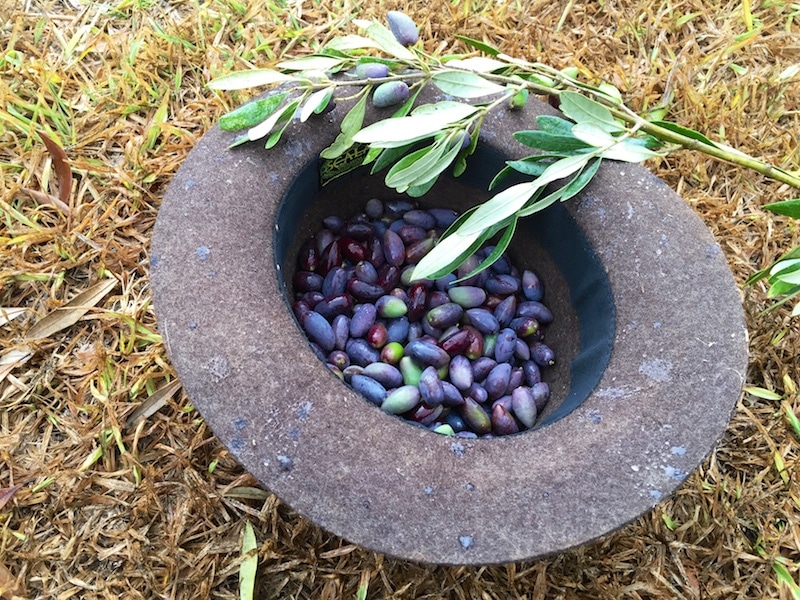
Tis the season to brine olives! Or salt them, if you prefer. Whether you’ve grown them yourself or foraged them from bird-sown trees, it’s late Autumn that you want to pick and cure them.
There are many ways to cure olives, but the essential thing is that you extract the glucosides from them – the chemicals that make the olives very bitter when just picked.
You can do this by curing them in water and changing it daily, or by brining them, or dry salting them, or salt and then smoke them… so many options!
In fact, we’ve written quite a few ‘how to brine olives’ articles over the years – so we’ve decided to gather them all together here, alongside our latest updated methods, based on 15+ years of olive-ing.
So – below is a few articles that we’ve written over the years, brought together. There’s even a video down the bottom of Nick brining olives in a caravan in Mudgee in 2007, if you’re really keen.
But first up, let’s start with the olive curing method we use year in, year out – it’s an easy water stage, and then a brine stage. And the result is a super tasty olive, no matter if you’re doing a 20 litre bucketfull, or just one small jar. enjoy x
How to Brine Olives – our fave method
Okay so after a LOT of years of experimenting with brining, changing water, brining again, and so on – this is our settled method for brining olives that is low on hassle and high on success and taste.
This method is a combo of fresh water and brining – it produces an excellent edible olive a few months after harvest (the exact time it takes will depend on your variety).
If you are super short on time, you can cheat with the ‘just brine them’ method by heading straight to the brining stage below this bit. Straight-up brining is fine, but will take a bit longer before the olives are ready AND they may have a more astringent taste.
The Water stage
In this first stage, fresh water is used to leach out some of the glucosides (the chemicals that make the olives very bitter when just picked) before you set the olives to brine.
This stage results in a sweeter (or less astringent) eating olive at the end of the brining process. Extra-recommended for foraged or wild olives, that may have more glucosides in them.
There’s lots of ways you can do this stage, but here’s what we do – for a balance between getting the benefits of the water stage, but also minimal hassle, and minimal water use.
Find a vessel you can drain regularly…
Find yourself a cooler or chilly bin with an external drain on it. Or a drum with a tap will do fine also. Cover the inner end of the drain with a little bit of mesh, so olives can’t get stuck in it.
Then, set up your vessel somewhere it can be easily drained by putting a bucket under the outlet – on a rock wall, an outside chair, or wherever suits you.
Add your olives and water, and set a reminder…
Then, add your just-picked olives to your vessel, and fill up the container with clean water. Rainwater is best, but use what you have. Cover the vessel and leave for 2 days – set yourself a reminder or write it on your calendar.
After two days, drain off the water, use it on your garden, re-plug the outlet and fill up with clean water once more. Set another reminder, and then do the drain/refill sequence again. Set another reminder.
Repeat, repeat, repeat…
Try and repeat this process for 14 days total. Longer is fine too, if you like (up to about a month) and a shorter period of time is still better than not doing it at all.
If you forget about your olives for an extra day or two, fear not – your olives will be fine. Carry on until it’s 2 weeks later, or you need to move on with your life. Now, it’s time to brine.
Once you’ve done the next stage you can store and forget about your olives for a few months, until it’s time to eat them.
The Brine Stage
So you might jump straight to this part once you have your olives (if so, wash your olives first) OR you might proceed here from the fresh-water stage above. Either way – yay it’s brine time!
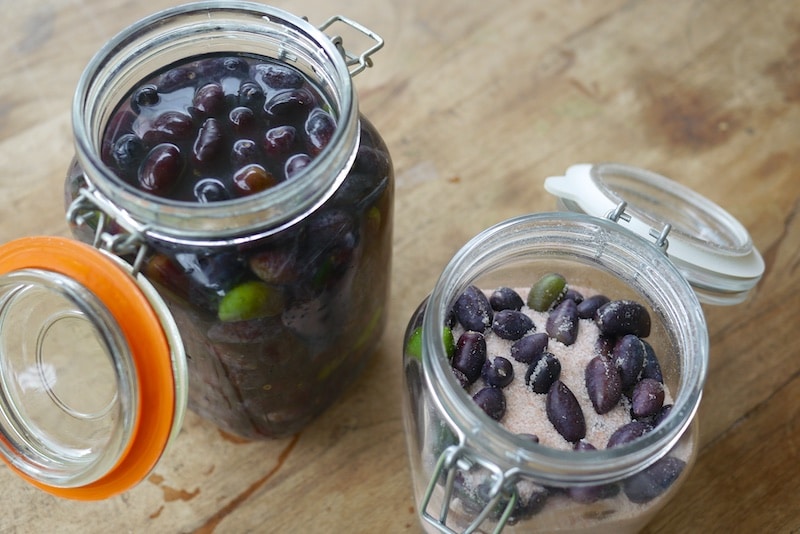
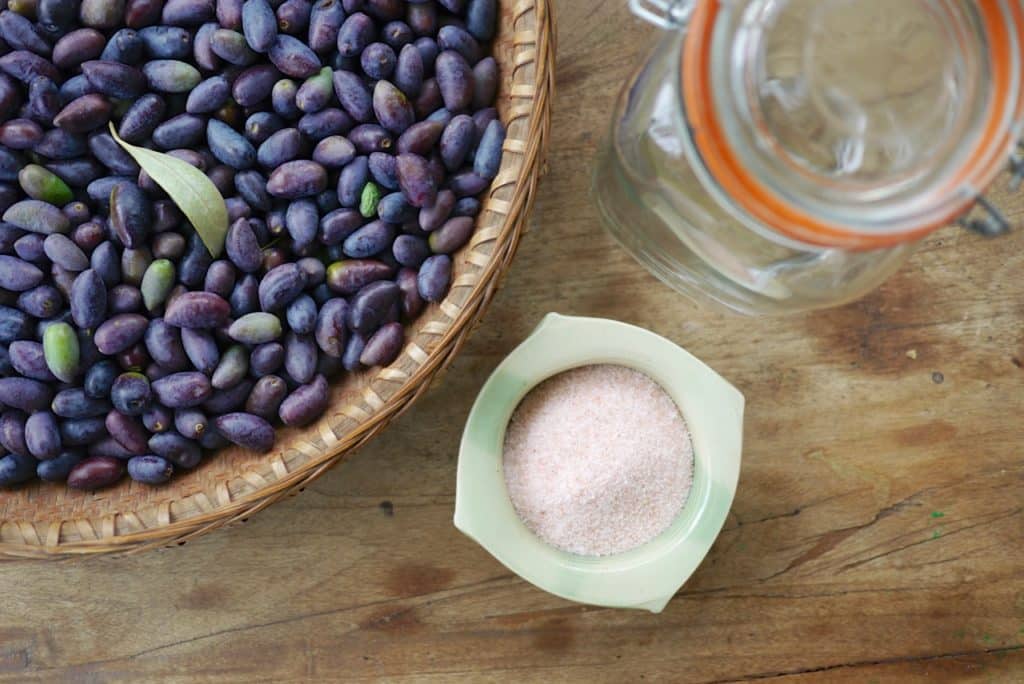
First things first – sort out your storage container that you’re going to brine in. This might be a glass jar, or a food-grade plastic bucket with a lid. Either is fine, use what you have.
10% Brine recipe:
- Water
- Salt
Ok here we go – 10% brine time! This is dead simple. Use a good, non-iodised rock or sea salt. We used Himalayan rock salt because we have a great drum of it in our pantry, but use whatever you can get that’s straight-up salt, without caking agents.
Note that our previous method used an egg – based on old-school advice, where you use the egg as a barometer to approximate a 10% brine – if the egg floats, your water is sufficiently salty. If it sinks, add more salt. We don’t use this method anymore! We now weigh the salt. But if you’re in a pinch, you can try the egg method.
So – firstly decide on your volume of water, based on the vessel that you’re brining your olives in. You might decide to make one litre of brine, or 10, or 20 litres. That’s up to you. A very general rule of thumb would be to make up 1/3 the capacity of your container.
Let’s say we’re using a 12 litre bucket to brine our excellent olive harvest. Therefore, you’re going to need about 4 litres of 10% brine. To make 4 litres of 10% brine, mix 4 litres of water (preferably non-chlorinated, if you can manage that) and 400g of salt together, to make a 1:10 ratio of salt to water – and that’s your 10% brine.
Again – it’s all about mixing 10% salt by weight with the amount of water you estimate that you’ll need. So 100g of salt for 1 litre of water, 200g of salt for 2 litres of water, and so on – you get the idea.
Tip: add the salt to a seperate container, boil 1/4 of the water you need, and pour that over the salt and stir to dissolve – and then add the other 3/4 of the cold water you need – you’ll end up with a lukewarm brine.
Once you have your brine ready to go, pack your olives into your chosen vessel a clean jar (squish them down a bit, the tighter the better) and pour the cooled brine over the lot, until the olives are submerged. You can add a plate on top, or some other sort of mesh, to keep the olives submerged underneath the brine.
Once your olives are in their brine
Keep your olives somewhere dark and temperature stable. The bottom of a cupboard is fine.
How long to brine
Like the proverbial piece of string, it depends – on the size of your olives, their ripeness, whether you did the water stage, and your desired saltiness.
Taste your olives after they’ve been in the brine for 2 months, and get to know the taste of brining olives – you’ll soon get a feel for when they are as you like them. 4 months to a year is the spectrum.
After the brine stage
Once your olives are ready and you’ve drained the brine off them (which will now be very bitter) – it’s time to decide how you want your brined olives to roll.
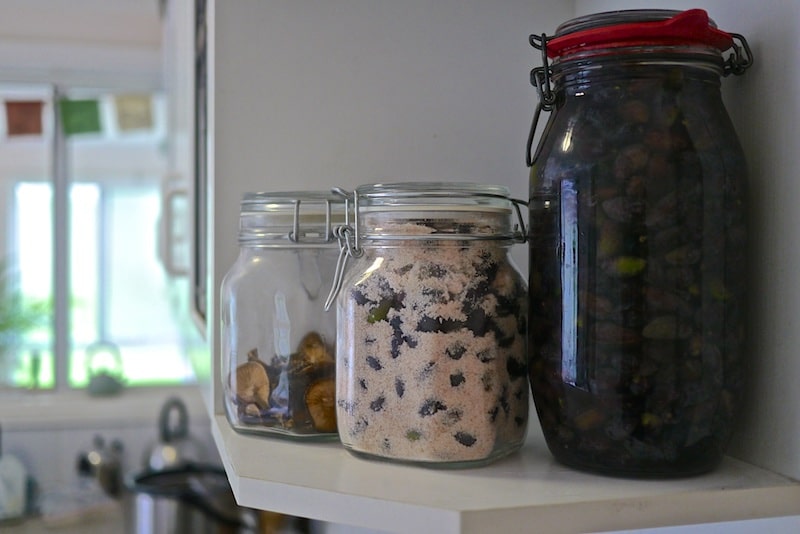
At this point you can proceed to store your olives in olive oil, or in 50:50 vinegar and water, or in a newly-made 10% brine in the cupboard for up to 6 months.
Adding herbs and spices and lemon slices at this point is good. You can also smoke them! Or just eat them.
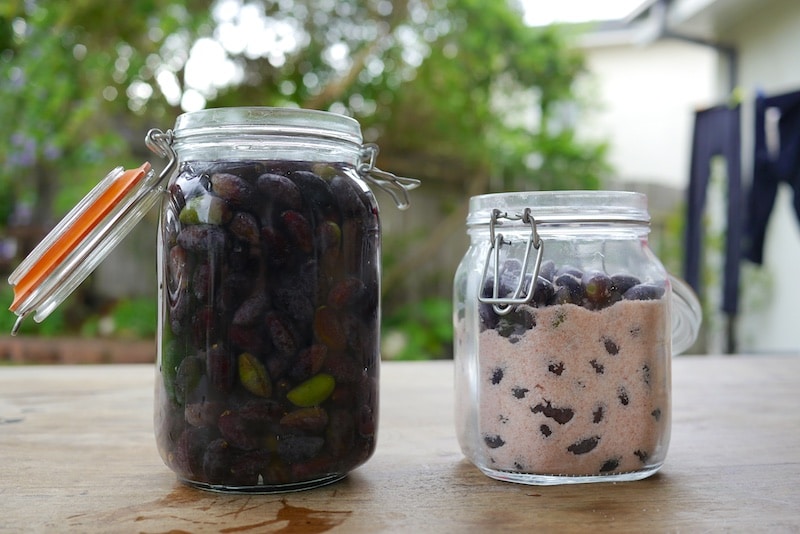
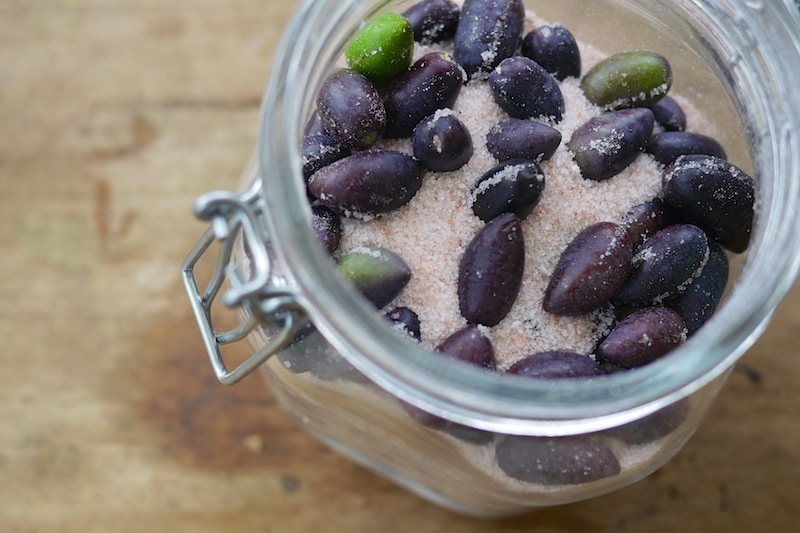
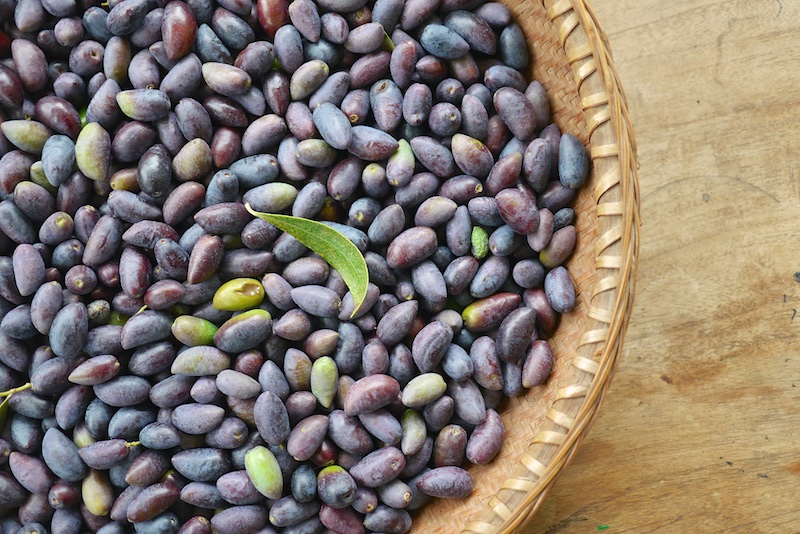
Dry Salted Olives
This method is great for smaller olives (like these kalamatas above, that we scored from a tree on our last road trip).
First up, make sure your olives are clean by giving them a quick wash, then drain.
Then, take your clean jar and add a layer of good quality, non-iodised salt, then a layer of olives, and so on until the jar is full.
The salt will trickle down between the olives, but as long as it’s all packed in there, that’s ok.
Your salted olives will need a shake and a turn ever other day – the olives will soon exude liquid and the whole jar will become rather slushy. That’s good. Keep going.
Start tasting your salted olives at around the 3 week mark, and when they taste right to you (saltier, and a bit shrunken, and slightly sweeter than brined olives), remove the olives from the salt.
Once your olives are duly salted, you can eat them straight up, or store them in oil with herbs. They’re pretty darn yummy.
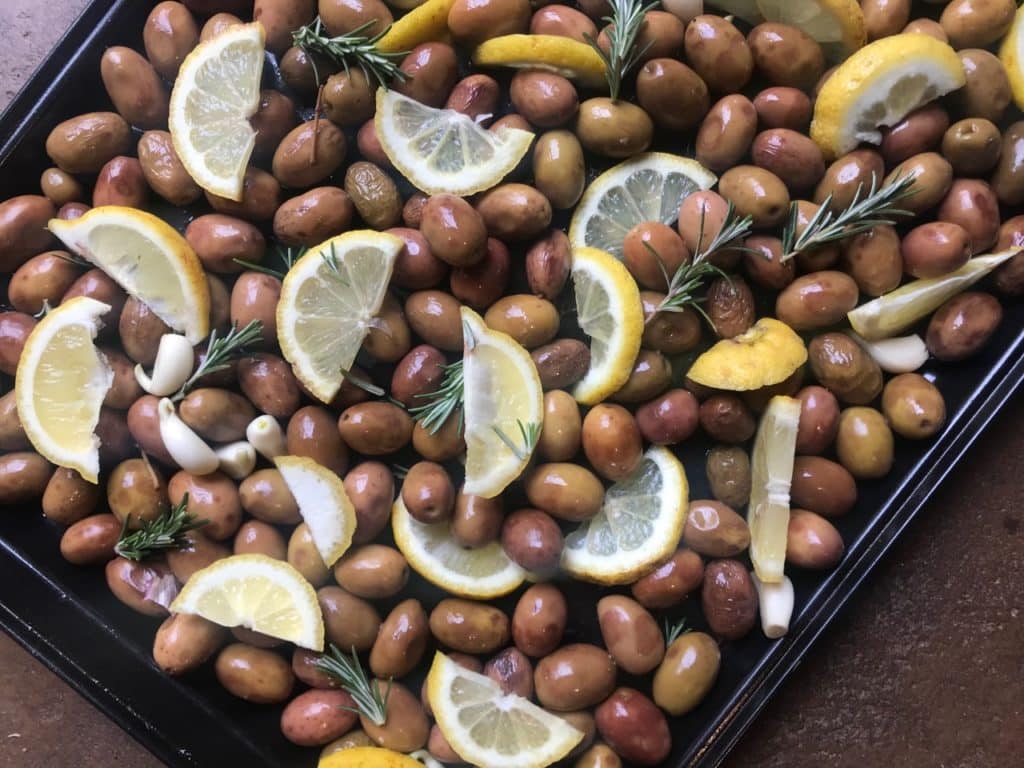
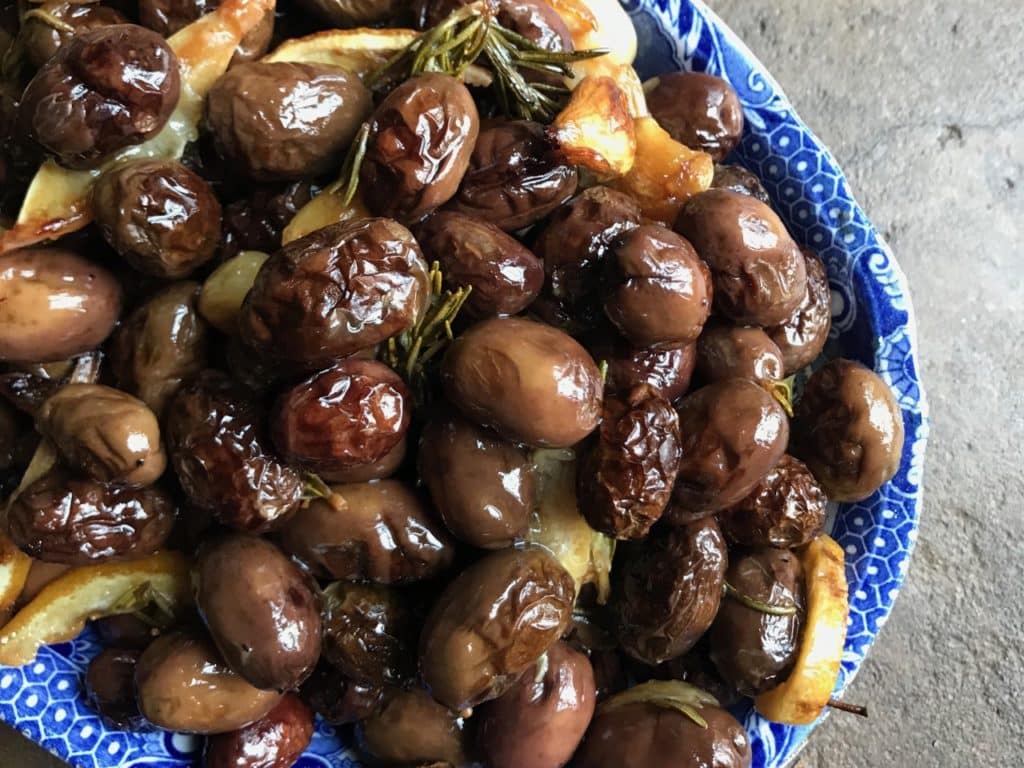
Our favourite olive recipe ever: Pearl’s roasted olives
This recipe is prettymuch what it sounds like BUT it’s no less amazing for that. Roasted olives is also an amazing way to eat ‘tasty but not that great-looking’ olives that have slightly bruised during the brining process, or were somewhat wonky to begin with. Your before-dinner snack plate will never be the same again.
We learned this recipe from our dear friend Pearl, otherwise known as Genevieve and/or Eggplantia (mmm actually I’m not sure many folks call her eggplantia, but anyhoo)… who put out a big bowl of these roasted olives one evening at her farmhouse table, and changed my life. They are really good.
You will need:
- Olives
- Lemon slices (orange or cumquat work well too)
- Lots of cloves of garlic (unpeeled is fine)
- Rosemary
- A slosh of olive oil
Heat your oven to about 220ºc, fan-forced if you’ve got it. Tip drained olives onto a large baking tray, and add lemon slices, whole garlic cloves, and bits of rosemary. Make sure the olives aren’t over-packed, and not multiple layers deep – if you have a lot, use two trays.
Slosh a bit of olive oil over the tray and mix everything around with your hands. Then, into the oven. Keep an eye on the tray and take it out at the 15 minute mark to agitate and give it a bit of a stir, then back in.
After 20-30 minutes, remove and cool. The exact oven time you use will depend on size and variety of olives, but you want the olives a bit blistered on top, the lemon slices getting very toasty, and the garlic getting very roasty.
Pour out the lot into a big bowl and serve to your loved ones, to snack on while warm. Also excellent cold, the next day.
So there you have it! Happy picking + foraging… and if you’re up for a blast from the past, here’s a video of Nick showing how to cure olives in 2007, from back in the days when we lived in a little caravan on a hillside, next door to an olive farm…
More posts about how to store the season with preserves + ferments here.
How do you cure your olives? Got any favourite recipes or flavour combinations for us to try? We’d love to hear…
We acknowledge that permaculture owes the roots of its theory and practice to traditional and Indigenous knowledges, from all over the world. We all stand on the shoulders of many ancestors – as we learn, and re-learn, these skills and concepts. We pay our deepest respects and give our heartfelt thanks to these knowledge-keepers, both past and present.


Slits r Us LOL
Thanks for your generous technologies enjoyed from time to time.
I remember an article you wrote a few years ago “Slits are us” but I can’t find it. However I slit my olives just like you do and it speeds up the process greatly. Is there any disadvantage doing this compared to that described in this article? Anyway, it works for me and the result is very tasty olives.
I’d be a bit cautious about the egg-float guide. Quite possible for an older egg to float in a too-weak brine.
As for keeping them submerged, I used a technique from the Abruzzo last year for the first time with olives. Use short sections of fennel stalks (flower end), roughly ‘woven’ together in a mat. Push that down on top of the olives and they stay submerged nicely.
Brilliant, thanks for the tip, this was one of my biggest problems, works beautifully
That’s a great tip! I’d like to try that with rosemary stalks this year.
Nice one 🙂
Submerging olives can be accomplished with a simple process regardless of the size container used to cure the olives. Available from Lowes or Home Depot is a black plastic fencing material in a roll. It’s rather stiff, but easy to bend. I cut it into mats slightly larger than the vessel opening and press it down on top of the olives and it stays in place holding the olives down. If your container is very large, like a 12 inch crock pot, simply place a stone on the middle of the submerged mat and it will keep the olives down.… Read more »
ROCK SALT CURED OLIVES – Marina Bistrin’s method. I cure my neighbour’s small to medium sized olives in coarse rock salt. They are the oval type – not the pointy Kalamata ones pictured in the article i have just read. (For some reason the kalamatas we buy are always slit whereas the oval olives are usually cured without any slit maybe Kalamatas are more bitter). With my method, i put the olives into pillow slips – say 1 or 2 kg in each bag and pour on course Rock Salt – the largest of the pieces is about half a… Read more »
My old standby is the score-soak-pickle method, very similar to yours, Kirsten. After scoring the olives are submerged in fresh water which is changed daily. After 4 days (black olives) or 6 days (green olives) they go into brine. I top up the jars with olive oil. 2 months later they’re ready. Can either be drained and eaten as is or marinated and then refrigerated.
Thanks Milkwood for your ongoing inspiration. At times you are truly a light in the dark of night. Has anyone heard of using sea water to brine olives? I live close to the beach and I have wondered if I could avoid the whole dehydration process to get sea salt and just go straight to the source? I’ve also wondered about dangling the olives in a net from a float and an anchor of some sort, in the ocean itself. This would avoiding the need to change the brine each day – just go for a swim a week later… Read more »
Tristan, I’ve seen references to curing olives in the ocean, on a few websites. It looks like it could have been an older tradition in Greece maybe. If you do a search on the internet ‘Curing olives in the ocean’, you will find some info. The tricky thing is not loosing the olives to the ocean.
Hi Tristan St Clare,
I have read that sea water is fine for brining olives, though I haven’t tried it myself. If I lived closer to the ocean I’d certainly use it.
Good luck.
Tristan- I have been told that using sea water is a traditional Greek method. Apparently they just used to hang the olives in a cane basket over the side of a boat and they rinsed and brined nicely. Worth a try I think.
Great info, thanks.
I am curing olives for the first time and need as much guidance as possible. One concern I have is the discoloured squishy bits on some of the green olives I am curing, see pic. Would you know if this is a disease or if it’s a normal part of the process?
I’ve got the exact same prob with my kalamata. Brown squishy patches form, discoloured blotches or the slit turns brown. I really would like a reply to this as I’ve been on 2 other blogs & others posted this same issue with no replies.
All my olives were clean & unmarked before the problems started.
A little bit of discolouration is pretty common. As long as your salt concentration is high enough it should be fine.
sorry Jennifer… can’t see a pic, can you try including it again.
Soft spots on olives can be an indicator of a fruit fly infestation. I suggest you take an olive with soft spots and look for pin holes anywhere on the olive including near the soft spot. If there are pin holes, cut into the olive directly below the holes and see if there are worms and discoloration. You may even see distinct tracks where worms have tunneled. If you do find evidence of fruit flies, discard these olives. The infestations are common to both black and green olives, and common to certain olive varieties, especially manzanilla. If you do have… Read more »
I’ve had my olives in brine for 5 months. I Just checked them today, and there’s a 1mm thick jelly like film across the top. Is this normal? Are the olives underneath okay to eat? Can anyone help me on this. Thanks!
This is common enough. If they are rinsed more often prior to brining this is reduced. It seems to be a mould growing on the sugars leached from the olives. Mine can get up to 1cm thick late in the season.
Olives that are a little deeper have usually been unaffected by the flavour.
Over time the olives are more likely to go mushy.
I have found that after I am satisfied with the curing, rinsing well, adding fresh brine and some acid ( vinegar or citric acid) lessens both the mould and the deterioration.
has anyone tried grape leaves? I use them on my pickles to make them crisp. The tannins in the leaves do that or so I’ve been told, works though.
yep, vine leaves are great for pickling – and yep you can use them with olives as well!
Hi there,
I was wondering if you possibly could answer some of my questions about brining. I did everything in your recipe but it seems after few days our olives are fermenting. Whole bunch of brine came through the top of the closed jar. And when I opened it there where lots of gas bubbles. Is that normal? Or are we doing something wrong? Thank you in advance for your help!
Yeast in the jar is eating the sugars leached from the olives. The gas is carbon dioxide. This is somewhat common if the jars aren’t cleaned properly and generally doesn’t affect the olives. This is much like the process to ferment wine. I suggest cleaning the jars thoroughly and adding purified water(available in supermarkets by the gallon). I haven’t seen this fermentation happen very often in the brining stage.
Hi there. Thanks for your advice here. I put my olives in water and changed each day then moved them to just salt for another week. I felt they weren’t bitter anymore so put in olive oil with lemons. Now after a day they taste a bit bitter again. I fear I did the move too soon. Can I move them back to salt? Thanks a bunch.
yeah I’d wash them and put them back in salt for a bit. Takes a while!
Thanks very much for putting together such a helpful post. I had a lot of olives and I’ve tried both methods described here. My salted olives are just coming up to 3 weeks and are close to being ready. However, they are very salty and I’d like to tone them down a bit. Do you have any recommendations for doing this? Should i soak them in water before storing them in oil/brine etc? BTW, a friend of mine is on a farm and it is important for him to conserve drinking water. This is one of the only recipes I… Read more »
Hi there, We’ve been curing olives for the first time using both the brine (without changing brine) and dry salt methods. They’ve been curing for around 4 weeks now. The salted ones no longer taste bitter and we think they’re ready. They are however very wrinkly – is this normal? The brined ones are worrying us a little. They are still a little bitter and maybe need more time, but the concerning thing is that they are quite bruised discoloured in places (picture attached). They were ripe to begin with but not overly so. We’ve read about botulism being a… Read more »
yes wrinkles are common for salt cured olives! Regarding your brined ones, we’ve often had them go like that with slight bruising – it means they were bruised during the picking process (the bruises become more apparent with time. Regarding botulism, I’ve only read of that ever being associated with things being preserved in oil, brining in liquid with vastly insufficient salt, or in improper canning processes. If you made a 10% brine, the literature says that is completely fine (an egg should float at a minimum of 10% brine). At the end of the day, though, it’s up to… Read more »
Thanks Kirsten!
We’re pretty sure that our brine was salty enough so I guess it’s just bruising. Given they were still a bit bitter we decided to take the brined olives out of their brine and try salting them for a while.
The salted ones seemed ready to go so we’ve got them marinating in oil and herbs for a bit before eating.
I just put them (all sizes, no slits-waste of time) in water salted to the max (when some remains on the bottom-very important). I make sure they are all submerged. After a couple of months they are ready to eat. I put them in plain water to remove some of the salt. I still have a couple of gallons on my counter in salt brine. And they still have some “taste” left unlike canned Calif olives which have all the character erased.
I learned to do my olives (among other treasures) from an Italian woman in my friend’s apartment building. She directly put olives into the quart jar, added 1Tbsp salt (I upped it to two when I did it on my own) and warm water to the olives then loosely balled a piece of wax paper on top to keep the olives from reacting to the jar lid. She didn’t teach me to score them, just told me not to think about them for a year after I had shook the jars once a day for a week and put them… Read more »
Ah love a handed-down recipe! Thanks and good luck 🙂
My salt cured olives are too salty. I have a reasonable tolerance. Tested with friends too. 3 weeks only. Now trying to work out how to recover them. Look like soaking in water might help. Any tips?
yes, water will draw the salt out… it does happen, depends on the type of olives. Soak in water for 1 week in fridge and taste test?
I have a question not sure if this is the right place to ask. Our Queen Olive tree broke at the base in very strong wind in Sth East Victoria- there were so many olives on – we have picked them – they are hard and we are not sure if we are able to use them- can we still put them in brine will they soften? Thank you
Hullo – well I live in Australia – and I just looked at some of my trees and they are simply loaded with fruit…..I think you are in the Northern hemisphere as I see that September is the time to pick. WE are just going into Autumn and May is the last month….so I guess this would be the time. I did this once before many years ago but the result was not very good – so hopefully your site is going to help me through the process 🙂 Sandie White
One more question – do I not have to change the water/brine during this time – just jiggle the jars every few days – this would be wonderful if this was so. 🙂
I brine my olives but I love your tip for using a ziplock bag of water for weighting them down! Perhaps I wasn’t reading properly but I didn’t see about slitting the olives for brining before you went on to the dry salting? I stab mine with a fork!
stabbing, slitting, whatever you like, it all works 🙂
Thank you so much for this information about curing olives. I have a day organised in a couple of weeks time for friends to come over, help pick and process my olives, learn how to do it and take home olives to do at their place.
My way of curing olives involves cutting each olive which is time consuming. Maybe your extra time in water obviates the need for this. I will try it!
yes we used to slit them also, but the water stage thankfully removes that need! A good trade off, I rekon. Let us know hwo you go, and happy oliving! 🙂
Quick one Kirsten – but first THANKYOU for distilling down a gazillion methods into a couple of straightforward approaches! Out of our recently inherited 300 olive trees, we’ve 2 particular varieties suited for ‘table’ preparation. With regards the water cure then brine, do you find significant fermentation activity once the olives are in the brine, e.g. should I be putting an airlock of a sort (I have several) to allow for gas release or do you find that this is unecessary? My jars do get quite fizzy during the initial water bathing period, this gas is released as I change… Read more »
heya – we find that the fermentation in the brine after 2 weeks in water is minimal, so we just lid the buckets and leave them, haven’t had a problem with fermentation there?
Thanks for the detailed information on Olive curing. I have learned much from your info. Olives were great last year. Thanks
so glad to hear it!
Your olive curing information has been extremely helpful for this first time curer! Not sure I’ve done it correctly, but that will be discovered in the tasting, in a few months. I have two trees on my property, one with large fruit, one with smaller fruit. Like other people’s comments my olives have discoloured in the brine and some don’t look edible. The ones picked green seem to be the tastiest at the moment. The riper dark plum coloured ones are still getting their taste on! If they don’t work out this time there will always be the next harvest.… Read more »
ah wonderful to hear, Judi!
Sooooo, first time doing this and so far so good I think. Just about to start the brine stage and in the method you mention to get your vessel (a clean jar) but then there is no mention of you can put the lid on said jar. I am wanting to put my olives in glass jars to brine, but then saw a comment about it bubbling etc, so not really sure what to do? Any help is great. Love your work!
Hi Amanda, yes you put the lid on your jar! will add that to article 🙂 – if you’ve done the water stage the olives, which will slowly ferment in the brine, shouldn’t bubble (ie ferment actively) and therefore lid-on is fine. You can also put a plate or tray under your olives and leave the lid a little loose, if they show any signs of bubbling. Good luck!
Hi my name is Kerry and I am trialling both your recipes as our fence line has about 20 different variety of Olive Trees and the neighbors said ‘help yourselves’! Once I have waited the three weeks for my salted olives.How do I then store them for future use?
Many thanks
Kerry
Hello Kirsten
All this is very new for me and am just experimenting
I read two different ideas for soaking the olives in brine, one is with a lid and the other is to just ensure all olives are covered in liquid. Is without a lid OK
Thanks
Peter Smith
Hi peter, we’d recommend that you make sure all the olives are underneath the brine – held down with gutter-guard if you have to! (or a more food-safe plastic mesh would be better, but that’s what our friends use) – a lid is recommended so no other critters can get/fall in, but it doesn’t need to be done up tight – good luck!
hi there. Just had a peak, to refresh my memory of technique. You “baked” the olives. Were these straight from tree, or previously cured?
heya, the baked olives recipe is for cured olives 🙂
thx Kirsten! good to know 😉 such a personal taste thing, olives. I love how our neighbourhood birds & even the family dog enjoy them, “au naturale”
I managed to misread the instructions and removed my olives from the brine solution too soon. They taste fine but are still way too astringent. I bottled them in olive oil. Can I drain off the oil and put them back into a new brine solution for another couple of months? I feel like a dummy, but if I can rescue them I might just be able to bear the shame!
Hey John! Yep, no worries – drain the oil, give the olives a rinse in some fresh water, and get them back in a 10% brine… the remnants of oil on the olives will rise to the top (which is fine) and you’ll be back in the game! Also, don’t beat yrself up – some olives are just much more astringent than others, some years… I’ve had batches that needed an extra few months, for no apparent reason other than taste!
Thanks so much for the reassurance! I’m sure they will be yummy eventually. I think I just got a bit over enthusiastic and overly optimistic! I kind of missed that part of the memo that said taste the olives after 2 months to see how they are progressing and didn’t read on to the bit that says they typically take between 4 and 12 months to cure properly.😁
Just one more question, when I opened the buckets after 2 months I noticed but there was some mold floating on top of the brine. As the olives were well submerged beneath the surface I assumed that the mold was feeding off organic matter that had floated to the surface of the brine and would not affect the olives underneath. So I simply skimmed the mold off and ensured that it did not come into contact with the olives. I assume that is all quite normal?
Hi John, yep I rekon that would be fine, that’s what i would do (and have done, many times) 🙂
Hi, thanks for sharing these methods. My brined olives have been sitting for a while and there is some green mould on the top of the brine. I’m wondering whether it’s okay to remove this and still use the olives underneath. Do you have any experience of that?
heya, yep a bit of mould can happen, but its usually not a worry if there’s not a lot of it, and it’s not coating the olives – I would scrape off surface mould from the brine and have a sniff/inspect/nibble of the olives beneath?
Thank you for all the advice. Last year I brined green olives, changing the brine every two weeks. It took a long while for them to cure, but they were good at the end of the process. This year I am trying your water first method on riper olives. Do you not change the brining water?
Generally no, we dont change the brine – the 2 weeks of water really helps that not be necessary. That said, it depends on your olives – if you’ve had a drought year for example, or they’re wild olives so may not have had as much watering as domestic olives, they may be more bitter – so sometimes a change of brine after a few months helps that. Just taste as you go? Hope they are delicious 🙂
my olives are turning to mush ,i have been changing the water every day for 30 days and they are 80% mush , what happen?
We have a couple of olive trees in our backyard which are covered in fruit!
Do you have any advice in when to pick the olives for use for brining?
In Australia, May is picking month… not sure where you are so maybe flip 6 months for Northern hemisphere if needed?
As i understand you can test if the green olives are ripe for the picking by picking one and squeezing it. If white liquid oozes out they are good to go.
Thanks for this great information. It answered all of my questions about preparing and brining olives.
Would there be any problems using cleaned out food grade 2 litre plastic milk containers to cure the olives
Do you have to split or score the olives?
I’ve been at the water stage for three weeks now but I forgot the olives for almost a week without changing the water. Do I have to throw them out and start again?
HELP! Hello team of follow harvesters! I have a question and to my absolut surprise (and somehow even a little delight) the internet has no answer for me! I have so far succesfully brined and enjoyed 2 seasons of curing olives using the very old school method of seawater brining (i live on a boat). I am aware its not as salty as recommend however since there is plenty of it I change the water more frequent and so far it worked fantastic. Till today: when I opend one of my many jars i am currently processing when my partner… Read more »
Possibly the result of enterobacteria. See Early production of table olives at a mid-7th millennium BP submerged site off the Carmel coast (Israel)https://www.ncbi.nlm.nih.gov/pmc/articles/PMC7838305/
I’m curing olives using a traditional Portuguese salt and water brine method passed from my grandfather, it’s very similar to this method and the Italian methods without any vinegar. After salt brining, my grandfather canned his green olives with bay leaves, lemon, and garlic and we still have a handful of his sealed jars years later! Unfortunately I am missing details about his last step in the process and he has passed away. How do you think he got the cans to seal and last for years without heating the brine or boiling (which I think will destroy the olives)??… Read more »
Hey Julia – hmm – if there’s a pop, sounds like they were water-bathed, to me? I found this resource, which seems to confirm that that is a thing – https://cesanjoaquin.ucanr.edu/files/35549.pdf
Julia, I know your question is from a year ago but I saw a video on YouTube where the guy made a hot salty brine and poured it over the packed olives in jars and then sealed the already brined olives to cure them. This hot boiling water seals the jars. He said they will keep this way. I’m trying this, this year. Hope this works.
I want the table of salted olive processing values. If you have any articles I would like to have them
Hey Ali – not sure if this is what you mean, but there’s lots of goodness re olive salting values in this page here: https://anrcatalog.ucanr.edu/pdf/8267.pdf
I just recently picked my olives – most green some where just starting to turn. Have been soaking them in water and changing every second day. They looked great to start with, but now are covered in brown soft spots. Is this bruising or something else that would be going on? Love to hear your thoughts
Lynda it sounds to me like bruising – which isn’t actually a big problem, we’ve found some varieties show bruising in the initial stages of pickling but by the time they’re ready, the visual bruises have disappeared? I would go ahead with your pickling, if that’s what they are – good luck!
Thanks Kirsten. I initially thought bruising, however some of the olives are covered with small spots of browning. I am wondering if it is an insect, like fruit fly. I picked green this year, I usually wait until at least 60% coloured, so maybe it happens all the time and I just haven’t noticed before. I will continue with the best of them, as they haven’t killed us in the past. 🙂
I appreciate you getting back to me.
Cheers
Yes I remember having those small spots also – I don’t know what we are, but they didn’t use to harm us! The ones that used to look particularly wonky, we used to roast. Roast olives are kinda the most delicious thing anyway, so that worked out 🙂
The dry salted olives are extremely tasty, our family favourite are a traditional Sicilian crushed olive, done when the olives are still quite green, we pick them when a few olives on the tree start to turn black, olives are the best.
yum!
Really helpful article. Have done the 2-3 day in water then in salt brine in jars. However, the ones that were black have lost their colour and are now green. Why is that?
Hmm! I do not know – but some varieties we have do that too, sometimes. Interesting!
I gather a number of olives every day that have fallen down from the tree. Is it best to add these to a bucket of water every day until there is a sufficient quantity to start the processing of draining and refilling with fresh water every second day for a fortnight. It could mean that some olives have been in the water for a much longer time than the most recent ones. Can anything go wrong with this method?
hey Don – yep you can do that up until a point, maybe over a period of 2-3 weeks, and then keep doing the water thing with ALL those olives for another week to even them all up a little? There will come a point where the olives need to go into brine to not go mushy, so having the range from ‘first to last’ olive over too long a time could backfire a bit. You could collect the olives each day for a few weeks and then to a big pick at the end?
Thanks Kirsten – I could also just add each days olives to a bucket of brined water to preserve them better and when I have sufficient I could then do the 2 weeks pure water treatment. Alternatively, I could skip the pure water part and just rely on leaving them in the brine for 6 months or so, although I suspect the water part would produce a better tasting olive. But its fun experimenting with different methods.
Kirsten, I have made an easy flow chart of my olive curing procedure which is basically your method. See my jpg file attaached.
I don’t know where my .JPG file went to but I will try to upload it once more. Oh I see, .JPG are not an allowed file type even though they are the most common form of photo type. I wonder what type of file can be loaded?
Hmm – sorry, no wordpress doesn’t let you add jpegs directly :L – If you email the flowchart to us at [email protected] , I can add it in here tho so everyone can see? Thanks Don!
Just posting Don’s flowchart of the olive curing method in this post that he kindly sent to us, – Thanks Don!
Thank you Don for the flow chart!
Kirsten, thank you for the very thorough explanation of brining and curing olives. I can’t wait to try the baked olives!
they are delicious!
Hi, This is my first time picking and curing olives off my olive tree. I am using a big fermenter bucket and am wondering if it’s ok when using the water method you mentioned to continue to add olives from the tree as they ripen. The olives seem to ripen at different stages and I am hoping to not use a different bucket or container as more olives become ready. I thought maybe I can just add more olives as I am changing the water and just extend the time I am swapping the water. Any help would be appreciated.… Read more »
Hey Adam – yep we’ve done this this way also 🙂 – it depends on the stretch of time you’re talking, of course… but if you’re changing the water regularly, it should be fine? I wouldn’t do the water phase for more than 6 weeks-2 months total, and the result that you’ll get at the end of the brining phase may be that some olives are softer than others, but they should all be good and edible 🙂
I’ve ended up with some small, clear-ish/white growths on top if my brine after a couple of months. Anyone ever have anything similar? The brine also smells very sweet. I’m assuming it’s safe, and just part of the fermentation process… but I’m curious if anyone has any insight here.
Hi Jimmy – look up ‘kahm yeast’ and see if the pics of that look like what your is? If yes, all good – it’s harmless, and a natural occurrence in salty brines. The sweetness is interesting – dip your finger in, and have a taste? It might just be a trick of the brine…
So very well explained Thank you!
It is my first go at this.
all the best with it 🙂
No mention of pipping or breaking skin of olives before soaking in water and then brine. My olives started to rot around the entry where I had pipped.
Yeah we don’t tend to pip or slice? Just found that they were fine without 🙂 – you may find that the bruising from the pipping isn’t rot, just softening, which is still fine? Hoping for your sake this is the case 🙂
Enjoyed the read. Will give the Olive a crack with your suggestions. 🇦🇺🙏
let us know how you go? 🙂
Hi Kirsten, so it is not essential to slit the olives before packing them into the brine?
in our experience, no. I know some people say yes, and maybe that IS the case if your olives are particularly bitter (or picked extra young, maybe?) – but in years when it’s been ‘all to much’ to split all of them, the resulting cured olives (which we’ve taste-tested between slit and non slit) have had no taste difference. That said, i rekon split olives might cure faster, if that’s a priority for you, bc obviously the brine gets into the faster? Sorry to all grandmothers that I’ve just disagreed with here, plz dont hex me 🙂
I’m loving the guide about preserving olives. So far it’s worked wonderfully. Thank you. The best advice I’ve found on the internet and I’ve tried for several years wiithout success. But this time – Hurrah! Thanks again.
Rosie
yr so welcome Rosie!
Yes! Me too. Lost my notes & did a random search. Not worth it. Your occasional newsletters help to remember where the Authoritative Source on Olives resides. Cheers!
aaah ours is a mash-up of previous wisdom! But it works for us, and so glad it works for you too 🙂
Tried your favorite method and…. I have been trying lots of others before AND i have to say yours is a winner for ease and flavour ! Thank you for sharing !
hooray! So glad! Our method is a combo of various family methods, and I’m sure yours will continue to evolve 🙂
You are correct as I am certainly experimenting with final flavours ! One thing I found was that they were a bit salty so I use a 5% brine mix for the final bottling stage. A 80% brine solution with 20% lemon juice + garlic and thyme is definitely a nice combination !