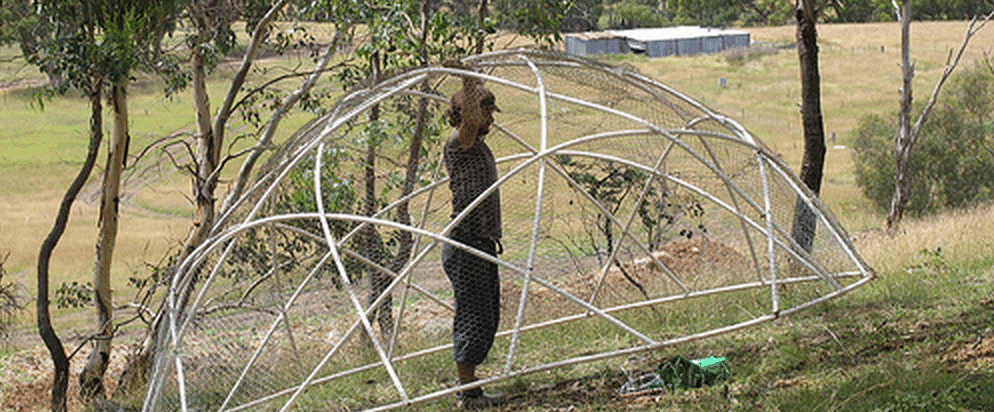
Maybe you’re already familiar with that classic Permaculture tool known as the Chicken Tractor / Chook Dome system. No? Awright – in a nutshell: In this context, a Chicken Tractor is any structure that can be moved from place to place in a garden with a bunch of chickens housed in it.
The chickens living in the tractor do what chickens are so good at: scratching up the soil and turning it over, making short work of any greenstuff to be found, and spreading their manure the length and breadth of the space available to them (not to mention producing eggs and more chickens).
By moving the tractor regularly you are left with a series of spaces for garden beds each the shape of the tractor, and each with the soil nicely prepared, the weeds and grass all pecked out, and a goodly amount of chook poo thoughtfully spread.
Mulch each new area heavily, and plant away – a great way to start a vegie patch, or a food forest.
Linda Woodrow, in her very fine book The Permaculture Home Garden, outlines a chicken tractor system based on a thing she called a Chook Dome, which is basically a hemispherical chicken tractor.
Chook Domes are great because two people can move them easily, the structure is reasonably strong, you can build them out of readily available materials, and you end up with circular beds – great for guild planting, and a more efficient use of space than say a rectangular bed.
The only real downside to the original Chook Dome design is that the structure isn’t particularly strong, usually takes two people to move, and needs to be replaced occasionally because the stress on the joints sometimes causes the whole thing to collapse.
Enter an improvisation upon the theme by a fella named Robert Freeman: The Geodesic Chook Dome.
The Geodesic Chook Dome has a couple of huge improvements on the Woodrow design: being essentially a geodesic structure, it is much stronger, and the stress is distributed more equally across the structure.
This means that ONE person can move it easily by standing inside the middle, lifting up and trotting off without the whole thing coming to grief. However, unlike a traditional geodesic dome (a la Buckminster fuller), which is composed of many triangles and therefore lots of joins, Freeman’s design is composed of long, curving struts which criss-cross the form and are anchored to the base.
This means there are essentially no bits that can break off, as all the joins are around the circular base at equidistant points, which again distributes the stress and makes for a very strong yet flexible structure.Anyone with a bit of a thing for Geodesic Domes should be impressed with the elegance of Freeman’s design, I think. Geodesic domes are also dear to my heart, as I used the form once in a certain art project.
It all sounds a bit complex, I know – but it’s really not that bad. Think of it as a great big garden puzzle that will increase your garden’s fertility a hundred-fold. What’s not to like?
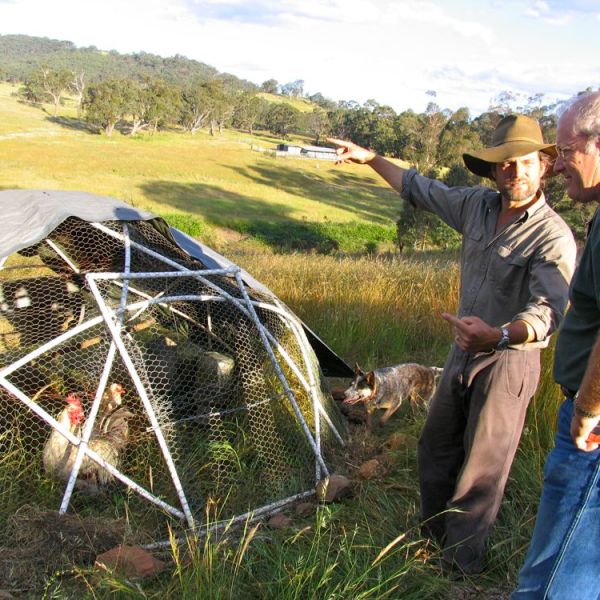
We found Robert Freeman’s plans online 2 years ago, and now our top food forest is slowly being established thanks to one of these structures. Our particular Geodesic Chook Dome houses an average of 6 chooks and 1 rooster.
We put in one nesting box made from the grass-collector of a lawn mower (great shape, strong, warm and you can get them at the dump) and perches for roosting.
For durability, we clad ours in scrap chicken wire rather than netting.The dome is surrounded with a ‘skirt’ of chicken wire about 30cm wide laid flat on the ground, which is held down with rocks.
This ‘skirt’ has been sufficient to prevent foxes or anything else digging their way under and into the Chook Dome, which is pretty good considering we are housed at least 500m away, well out of earshot and scent range.
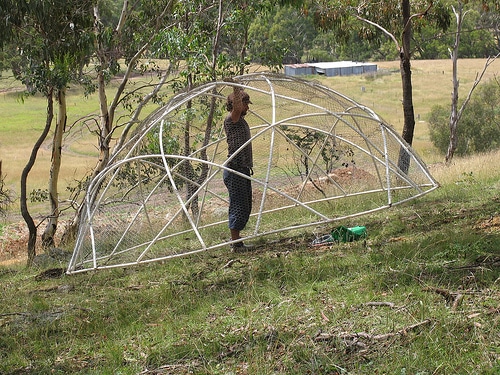
Nick inside a completed Geodesic Chook Dome – note the strength of the shape when lifted – no distortion or weak points…
Each time we move the dome, it gets pegged down with tent pegs hooked over the circular base. For shelter we have a large tarpaulin which is pegged down over the dome separately. This is an important point – always make the shelter sheet for your Chook Dome a SEPARATE PEG DOWN AFFAIR from the actual dome. A dome with a shelter sheet either attached or incorporated is, in fact, a large, very effective kite.
We rotate our Dome every two weeks-ish and a couple of days before we move it, we drop in a bale of lucerne hay through the door. The chooks think this is Christmas and love scratching up the hay and spreading it all around their dome. It’s a free mulching service! Thanks chookys.
Our dome ended up being about 3m wide at the base, about 1.6m high at the apex inside, and can be lifted comfortably by Nick or lifted uncomfortably (but it’s quite possible) by me. To lift and move it, Nick just stands inside at the apex, lifts up with his hands, and off he goes.
I keep an eye on the chooks and herd them back in once the dome has come to its next resting place (a handful of scratch mix or some tasty greens always helps to get them back in). Ours has been running about 18 months at time of writing, and is as sturdy as the day it was born.
Robert Freeman has very kindly invited us to host the calculations for his fabulous design here at Milkwood.net, so see below and feel free to get cracking.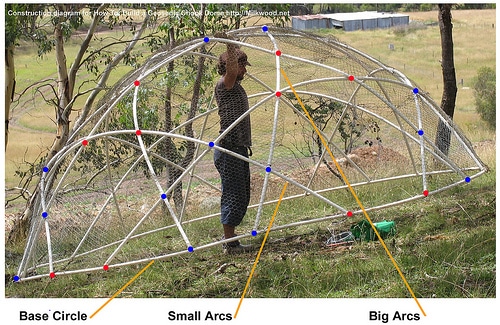
Plans and calculations to build your own Geodesic Chook Dome, by Robert Freeman:
| 1. Choose the size of dome you want: These instructions are for a 3/8 sphere. If I remember correctly, a 10-pipe dome is approximately the same size as described in Linda Woodrow’s book. I used white PVC piping, but perhaps 3/4 inch rural grade poly pipe might be rigid enough to work. It would be a lot cheaper I guess. | ||||||||
| Total number of 6m lengths |
9.00 |
10.00 |
11.00 |
12.00 |
13.00 |
14.00 |
15.00 |
16.00 |
| Total length of pipe (m) |
54.00 |
60.00 |
66.00 |
72.00 |
78.00 |
84.00 |
90.00 |
96.00 |
| Area of chook yard (m2) |
9.49 |
11.71 |
14.17 |
16.87 |
19.80 |
22.96 |
26.36 |
29.99 |
| 2. Join the pipe together and cut the lengths you need (meters). You won’t need any joiners if you measure your cut from the end without the bell, and make the circle last. Join the pipes with special blue solvent glue you can get at the place you got your pipes. | ||||||||
| Circumference of base circle (1 of these) |
10.92 |
12.13 |
13.35 |
14.56 |
15.77 |
16.99 |
18.20 |
19.41 |
| Length of Big arc (5 of these) |
4.84 |
5.38 |
5.91 |
6.45 |
6.99 |
7.53 |
8.06 |
8.60 |
| Length of Small arc (5 of these) |
3.78 |
4.20 |
4.62 |
5.04 |
5.46 |
5.88 |
6.30 |
6.72 |
| 3. Use these sizes in Step 4 (these are the sizes of the sides of the triangles in the dome) | ||||||||
| B–B (m) |
0.47 |
0.52 |
0.58 |
0.63 |
0.68 |
0.73 |
0.78 |
0.84 |
| B–R (m) |
0.56 |
0.62 |
0.69 |
0.75 |
0.81 |
0.87 |
0.94 |
1.00 |
| R–R (m) |
0.59 |
0.66 |
0.72 |
0.79 |
0.85 |
0.92 |
0.98 |
1.05 |
| 4. Mark where the pipes will cross (the apexes of the triangles–where two pipes cross will have a mark of the same colour. I use a blue and red marker). B-B is the length of the space between 2 blue marks; R-R is the length of the space between 2 red marks; and R-B (or B-R) is the length of the space between a red and a blue mark as given in step 3, above. The first and last marks are at the end of each length of pipe | ||||||||
| Big arcs | B-B-R-R-B-B-R-R-B-B | |||||||
| Small arcs | R-B-B-R-R-B-B-R | |||||||
| Circle | B-R-R-B-B-R-R-B-B-R-R-B-B-R-R-B-B-R-R-B | |||||||
| 5. Assemble your dome To avoid crimping the pipe, start by making a pentagon fastened* at the blue points in the centre of the 5 big arcs. (Before fastening, weave the big arcs over and under each other.) Stand this up inside the circle. Check that the big arcs continue the over-and-under pattern where they cross each other at the red points. Now fasten the ends of the big arcs to the base circle at the appropriate blue points (I found it easier to put all the ends on the inside of the circle, although this does upset the over-and-under pattern). Fasten where the red points of the big arcs cross (Sometimes errors creep in when measuring, so even out any odd places and fasten where the pipes want to cross—it’ll be close to the red marks). The dome should now be quite stable. Weave in the small arcs, keeping the over-and-under pattern. Fasten temporarily until you have them all in place. That way you can even out any slight measurement errors.* I fastened where the pipes crossed by drilling a small hole through both pipes and tying them together with a piece of wire. Perhaps you could use cable ties; these are cheap, strong and easy. And if you don’t like your dome, you can still use the pipe. I’m going to use these in my next dome. | ||||||||
| 6. Clad your dome with chook netting: Making the dome was the fun part. Cladding is not so easy, but the chooks aren’t fussy about appearance so be inventive. | ||||||||
| 7. Peg your dome to the ground! Plastic pipe is great: it’s easy to work and lightweight, but it can make a great kite in only a moderate wind. The pipes are flexible and don’t break easily, but the joints are quite rigid (and also maybe the glue weakens the plastic?). When I found the first of these domes blown into a tree, it was fine except for 3 clean breaks right at the joints. So the moral of the story is: Peg it down. | ||||||||
Thanks Robert! And it’s worth noting that this design works well on a variety of scales – I’m looking forward to building a mini version (1.2m across) for our raised beds in our vege-garden-to-be at Milkwood this coming spring…
** 2011/02 update: Just a note to say that the geodesic chook dome is still going strong and structurally sound 2 years later! And still being moved every 2 weeks or so, as our top food forest crawls slowly across the landscape.
We even recently showed our dome to Joel Salatin during his visit to Milkwood Farm. Joel’s polite but subdued interest could be due to the fact that his eggmobile and pastured poultry systems are a little more advanced than ours! Never mind – we love it, and it’s doing a great job for what it is. We’re looking forward to building more!
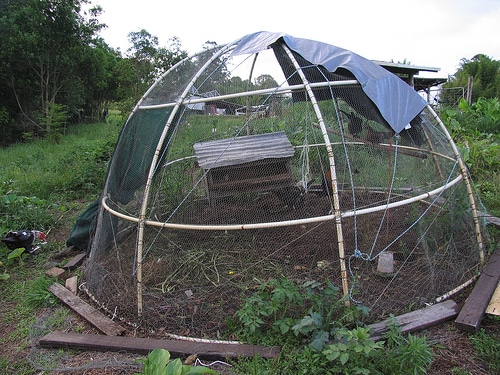
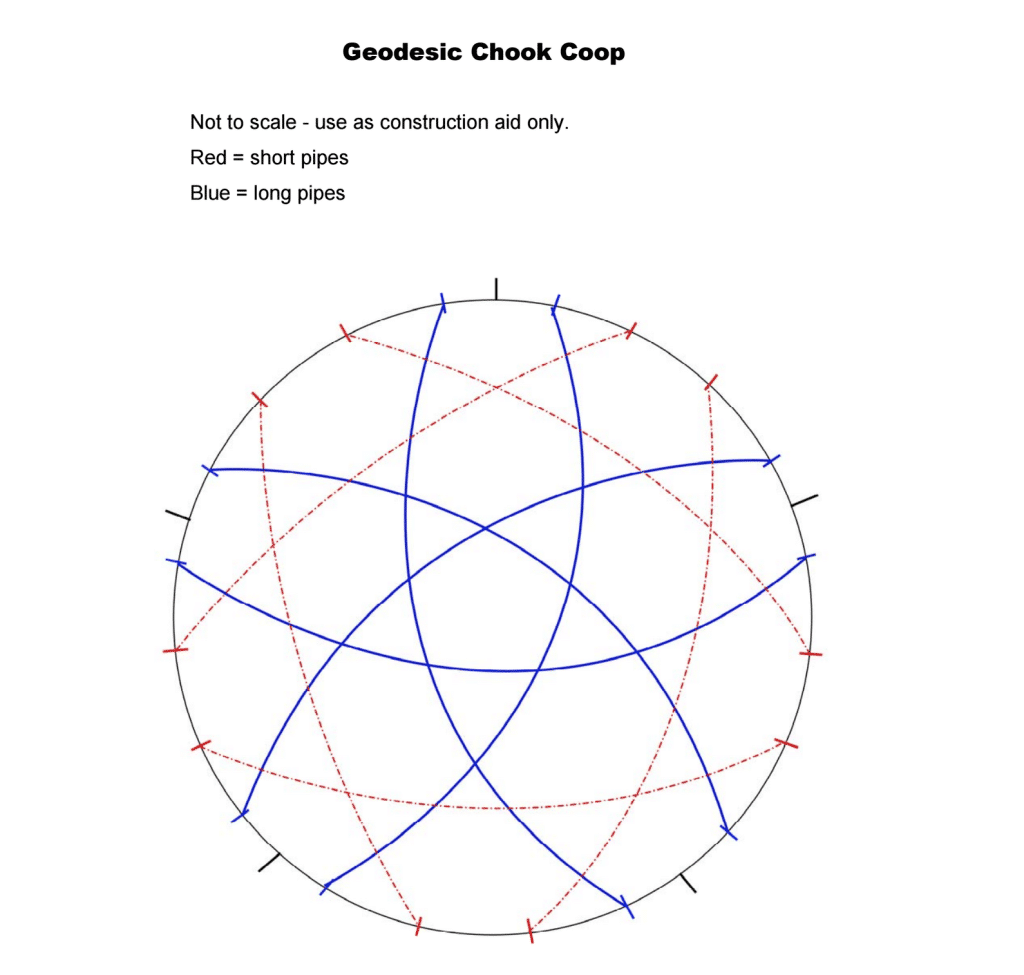
***2013 update – Richard, who commented below – sent through a helpful picture to help future geodesic chook dome builders:







Hi there,
great article! I’m halfway through building a Lind Woodrow design chook dome and struggling with lack of rigidity and how to effectively brace it. This geodesic design looks great. I can’t read the plans properly because your website design encroaches on the right hand side of the text. Could you email me the design by Robert Freeman, or provide a website where he has it posted? I can’t find anything with a google search other than your site!
Thanks,
Nathan Chattaway
Permy in Cromer SA
we’ve changed it now, Nathan! Take another look?
Love, love, love the article.. and the structure satisfies all my requirements! Please forward the pdf at your earliest possible convenience.
Thanks, Utilas forever farmer
Oh dear… I dont know where I went wrong. I followed your instructions (diligently I thought) I used 25mm polypipe. But it was really difficult to measure as its not straight, and I think I ended up either/both getting confused and accumulating ALOT of error. It all went wrong went I put the small arcs in. As Dad said, it looks as if its about to get up and walk away. I made the smallest one, but even still I think will be too large for my needs on a quarter acre block. Next time Ill try the PVC and… Read more »
We’ve just completed our geodeisic chook dome from the instructions you provided. All the measurements worked out well for the 10 pole dome. When we were halfway through installing the small arcs, the bottom ring snapped in one spot(near a bell). We decided to reinforce it with a ring of black poly pipe on the inside, wired to the outside ring. The chicken wire was tricky to put on, we ended up using rip ties and folding the wire in places to conform to the dome. We did 90cm of wire at the bottom, and covered the rest with a… Read more »
No worries, Michelle! Bring on the endless improvements of open-source knowledge… can we see a pic of yours?
We got our chookies today! The lady we went to only had 3 point of lay hens, so we also got another 6 younger ones and a rooster. Mostly sussex, with one australorp, one aracauna, and one wyanadotte. Anyways, they seem to be doing well in the pen so far, I made nest boxes out of milk crates. I’m a bit worried about snakes getting in underneath, I may end up making a skirt for the dome. Also, I moved it today and it was heavy, but I managed ( we do have an extra pipe and heavy perch attached… Read more »
when i get a place i’m going to have ago making it.I really please the way it is built cause it doesn’t cost very much which is really good and it doesn’t look award to movie.
Thanks for the blueprint. I was wanting to make a smaller one, perhaps 4-5m square. Is it simply a case of halving the 6m lengths?
I wonder perhaps if it would be an awkward size- having to stoop badly to get in and difficult to shift from the outside?
I would love to make this though my circular plots are 180cm wide. (in the city, small block) I see your measurements are enormous. Do you have any suggestions re piping. Could you suggest the pipe won’t bend on a smaller scale? Electrical conduite perhaps instead?
Hi Corrin, the pipe we used is electrical conduite, and we’ve seen a thinner gauge of it work well on a geo chook dome of a smaller scale (about 1.2m wide). The measurements are scalable – you can adjust them to any size…
I’m about to give this a red hot go. Above states you just glue the joins? I can see it’s all woven but then just glue? and then when the arcs meet the base circumference? what do you use at those points? Surely glue won’t hold as there’s not enough joint surface to adhere ..
Well I made it! took me best part of a day, and had to make some alterations as my measurements just didn’t work out (uggghhhhh!!!!). So I decided not to include the 5 smaller arcs, and since it was half the size of your smallest measurements, it is still beautifully sturdy .. I chose to use holes and wire to join all points, and with some conduit left over I used a piece to add a perch.
Very pleased with myself.
A few years back I found a link for a long split bamboo dome. I haven’t tried it yet, but it looks similar to what you are doing with pipe.
http://www.stardome.jp/index-en.html
I have finally completed my chook dome but the question is “How many chooks do I put in it?” The diameter of the circle base is 4m.
A chicken generally needs 1 sqm each so you could actually fit 12 chickens in there but I would aim more for 6 chickens to get a good balance 🙂
I spent a long time looking at your chook dome plans, but I was intending to repurpose some damaged black dripline – not exactly easy to mark in a way that’s visible and I couldn’t find anything remotely like the glue you used. In the end I found a proper geodesic dome design much easier to get my head around, and after a failure in the first attempt – the dome was much too large for the size of pipe – the second version was a great success. Pictures and more details here … http://permaculturinginportugal.net/blog/geodesic-dome-chicken-tractor/
How did you attach the wire? And wire is usually about 1 metre high did you wide it around horizontally or vertically?
hi kirsten,
just wondering how your chickens fare in the dome during cold weather? I’m keen on a lightweight movable chicken tractor, but we get pretty heavy frosts and low temperatures in winter (southern highlands nsw). I know it gets pretty cold out your way too so I’m wondering if you do anything special in winter in the dome?
thanks
I love the idea but don’t really understand why you say it’s a more efficient use of space than a rectangular bed – circles don’t tessellate. If you want a garden bed that’s twice as big as the ground space of the dome, you’d end up with an odd figure of 8 shape, instead of a large square as you would if you used a rectangular structure.
Hi, Using your plans as a guide, we made a “10 pole” sized dome about a year ago with three variations: we used 25mm poly pipe because we already had some lying around, we drilled long bolts through for the joins after hearing some stories of glue difficulties, and we added a chicken wire “skirt” around the outside as a precaution against digging predators. It’s still going strong a year and a bit down the track. We would not use the poly pipe again as it is simply not rigid enough – the dome bends when lifted and takes two… Read more »
No worries, thanks for the update Amanda!
Hi, I ‘m about to make dome same size as yours, did you use 20mm or 25mm pipe?
Hi Kirsten, Thanks for this great design. Been looking for an alternative and sustainable chicken coop for my 4 chickens in an urban back yard. Made one of your design with a 3 meter diameter, from 10 lengths of 3/4 sch 40 PVC – very sturdy! And standing in the center you can feel the concentration of energy that is most pleasant and energising and I am sure is good for the chooks! The biggest difficulty I had was figuring out where to attach each length of pipe to the base. Difficult to work it out from your picture. So… Read more »
that would be awesome! kirsten at milkwood dot net 🙂 thankyou!
I would love a copy of this PDF too, it Richard has shared it with you?
Hi Leanne, – be happy to send it to you if you give me an email…
Hi Richard,
Do you think you could send me the PDF as well? I’m just starting to build one of these. findleo at gmail dot com.
l_allen11 at hotmail dot com. Thanks! Just going to give it a go today!
Richard . would you please send me a copy of your pipe attachment locations on the base of the geodesic dome Thank Yoy Dennis – My email address is – queenbeeandthehappydrone@yahoop.com
Hi I provide a hub system to allow you to build any size chuck dome you like. Im based in Uk but can ship low cost as hubs pack flat. My website is http://www.domemade.co.uk. Take a look
I’m keen to give this a crack, although the photos on this aren’t currently working I google imaged Geodesic Chicken Domes and eventually found the actual images of this page. One of the benefits over sharing ideas.
I’ve also decided I’m going to try it 19mm poly pipe as I have an excess of it here. I’ll let you know how it goes.
Since the blog redesign the photo content in this article doesn’t load. Is anyone else having that problem?
thanks for the tipoff – will fix today 🙂
Looking forward to seeing the photos again!
sorted.
Hiya, this is great & I’m definitely going to build a smaller version, as I have based my design on 3m diameter beds, following Linda Woodrow’s system. My question is regarding the pipes. Are these the 20 or 25mm diameter rigid pipes that is often used for backyard reticulation applications? I’m just concerned that this stuff snaps pretty easily when bent. I can’t imagine bending 10m of it into a circle for the base without it snapping, nor bending 3.8m lengths into small arcs. I have been pulling out my old retic the last few months, and while it does… Read more »
Hey alexis. These pipes were 20mm PVC electrical conduit. This stuff is everywhere in Australia. Best to try and get some used stuff from a demolition site, as the production of PVC is really bad for the environment….. the end product is also used for drinking water pipes so it is not considered a health risk. No need to buy it new.
Robert Freeman chiming in here. Just for the record, this is not 100% my own design….I modified it from an idea published in “Domebook 2” Paperback – January 1, 1972 by Lloyd et al. eds. Kahn (Author)
You can download a scanned version here
https://pacificdomes.com/pdf/domebook-2.pdf
The original is on page 95
Hi Robert, Great to hear from you. 🙂 Thanks for the links. We’ll update the post with references. Hope you are doing well in these trying times.
Greetings from South Africa!
I have been looking at your website to gain ideas for building a geodesic chicken dome. One thing that has struck me is that there is no indication of a weatherproof coop for the birds to sleep in and for laying eggs. Please let me know what you use for this aspect of their housing.
Thank you.
Kind regards
Stephen
Hey Stephen – the structure itself is the plain wire, then we just put a tarp over it (as you can see in the pics) to create weather covering for the chickens. The laying box is inside, we used a grass catcher from a lawn mower (the removable back bit) and that works well for 2-3 chickens to be laying at once?