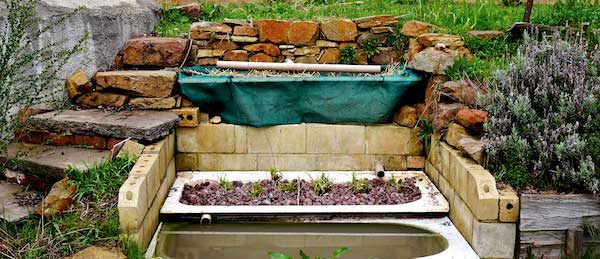
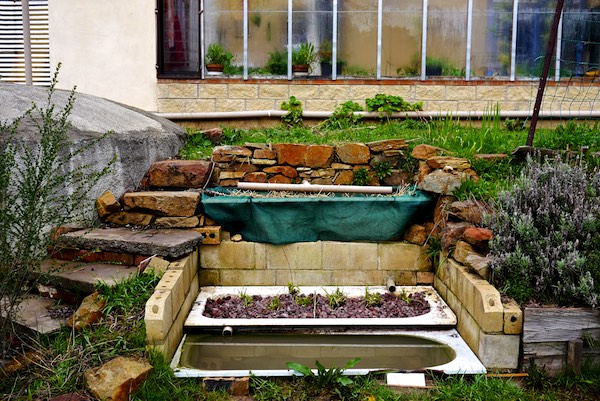
Greywater is a fabulous, though often underused, household resource that should be used wherever possible. Here’s a home made 3 bathtub greywater system that’s simple but effective.
If you live in an area where water is precious at certain times of year (and when is it not?) then catching, storing and using every drop you can to create a more liveable home and surrounds is an excellent idea.
At Melliodora in Victoria, the studio cottage does its best to do just that, by catching, filtering and re-assigning the greywater to useful purposes in the garden.
While this design will not suit everyone, it will suit some, and it’s a simple, cheap and effective way to deal with, process and make the most of a small household’s greywater.
Grey vs Dark Grey vs Black Water
There’s a couple of types of water that come out of a regular Australian household, which are commonly broken down into a few categories. Opinions on what goes where sometimes differs, but generally speaking:
Greywater – water from the shower/bath, handwashing sinks, washing machine – water that has a low loading of bits in it other than water, and minimal human pathogens (ie poo).
Dark Greywater – water from the kitchen sink and/or dishwasher – water that has a higher loading of proteins, fats etc than greywater, and more ‘bits’.
Blackwater – water from the toilet or elsewhere in the house that has a high level of potential human pathogens (ie poo). This type of waste water is *not* suitable for the below greywater system. If possible, build a lovable loo or wheelie bin compost toilet instead (or a commercial composting toilet system), and use your precious water for things other than flushing, which wastes not one but two valuable resources in the process.
The system below is a greywater system that also deals with a small amount of dark greywater – as it processes the outputs of a shower, a kitchen sink, and a washing machine.
Greywater System Pointers
With any DIY greywater system, there’s a few basic things that you want to achieve with your water:
First in, last out – you want to filter the water as much as possible, and ensure no water can ‘jump the queue’ somehow and come out the other end unfiltered. This means planning an appropriately sized system for your needs, and making sure the water goes where you want it to.
Maximize dwell time – the more filtering that your water gets in the system, the better. Because this means more time for the microorganisms int he system to do their thing, and clean up your water as much as possible.
That said, every day brings more water, so you also a system that easily manages the outflow, and a plan for where to point/use the water next, after it’s been through the system.
Minimize inputs – to the system, in the sense of things like soap, goop, shampoo etc, which make the water more alkaline. Everything you use, or do, has an effect somewhere else in the system. The same is true on a town-greywater level, but we don’t notice the effects.
In a home-scale closed loop system however, you do. So use minimal amounts of greywater friendly products to ensure your water is as clean as possible.
Biology works – all hail biology. The more biology you can get onboard to help you with filtering your water, the better. Getting biology do the work minimises complicated systems, external inputs, and is a DIY regenerative approach that can be re-started if an aspect of the system breaks, without buying another one off the shelf.
The below system uses worms, reeds, microorganisms and a cropping bed.
*a note that with the exception of the scoria rock, this system was completely sourced from junk – scavenged parts from the tip, and friend’s backyards. So the total cost of building this system was about $50.
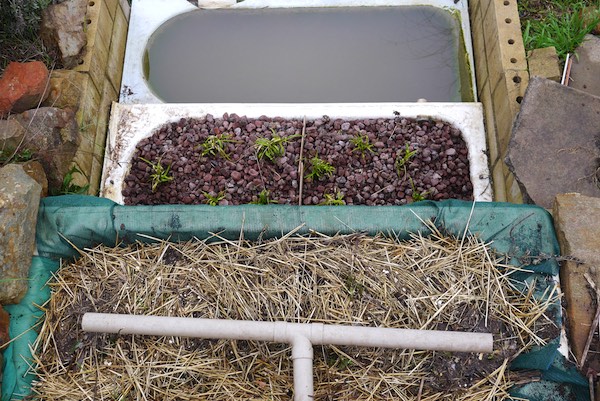
3 Bathtub Greywater System:
This system was designed by David Holmgren and built with friends. It’s context-driven, so not suitable for everywhere in the world, but it’s a great solution to the needs of this sized building, in this climate, on this budget.
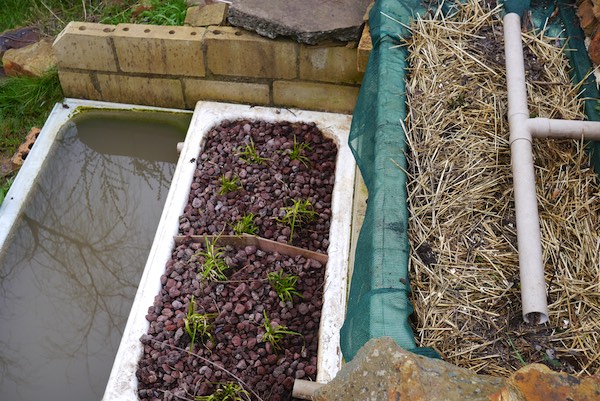
We took the below photos while we were giving this greywater system a clean-out. It’s about 5 years old at this point.
Worms, Reeds, Sit, Onward…
So the inputs of this greywater system are from the studio’s shower, kitchen sink, and washing machine combined.
The input water goes in the top tub which is a wormfarm, drains to the second tub which is a reed bed, and then sits in the bottom tub until further inputs cause an overflow, at which point the filtered water flows slowly down a ditch drain to a main crop growing bed.
Tub one – Worms
The first tub of the system is a wormfarm. The worms appreciate the regular moisture, and eat up any solids that arrive out of the inlet pipe from the kitchen sink.
The inlet pipe is open at each end, and has a series of small holes all the way down it’s length to allow for even-ish distribution of water into the tub.
It’s important to keep this first tub well drained so the worms don’t drown, so in this tub the water goes in the top, then drains straight through to the bottom outlet.
The base of the worm section is raised on plastic arms holding up a wire mesh (called ‘bar chairs’, they’re used in concreting to hold up the re-bar – you could also use bricks). On top of this sits some old shadecloth which acts as a sieve – worms and their solids stay in the tub, liquids (mainly the greywater) drain out to tub 2.
The shadecloth also makes this tub easier to empty every two years or so, like this day. After harvesting most of the worm castings, fresh straw is put down, followed by a small layer of castings (and worms!) and then covered with more straw.
The system is now set for another 2 years of processing the household waste and water, while building up another valuable harvest of worm castings in the process.
Tub two – Reeds
The second tub contains scoria – a local rock that’s close to pumice, with lots of cavities for microorganisms, and Umbrella Sedge Cyperus eragrostis – which is a hardy wetland plant suitable for this climate.
The idea for this tub is that the water comes in at one end, and is pushed under tile baffles in the middle of the tub to make a longer journey for the water before it can reach the outlet at the other end of the tub.
While the water is in this tub, it’s filtered by the rocks and their resident microbiology, and the roots of the reeds also.
The reedbed part of this kind of system is often the trickiest to renovate and clean, as the roots of the reeds get tangled in the rocks and are generally bloody hard work to dig out, clean, and re-install. In this comparatively small-scale design, this task is manageable because of the tub’s size.
Tub three – Holding Pond
The water comes out of tub two and into the holding pond.
Once this fills up, it overflows gently to a clay half pipe and then onto a shallow earth drain which deposits the trickle of outgoing water into a large garden bed used for summer main crops like corn, wheat etc. Green manures are grown in this bed over winter.
The outputs of this third tub could alternately go to a forest garden, shade trees or similar, depending on the needs of the home.
The harvests of this system could be said to be: fertilizer in the form of worm castings plus a main crop of veggies each summer. And a closed loop greywater system that harms no waterways, and empowers it’s residents to be more self-reliant. Wins all round.
As with any system, there’s always room for improvement, and these will surely come over the years. But for now, it’s a great little system that works well to process a small household’s greywater outputs – with minimal maintenance and cost, plus some beneficial outputs.
Thanks to David Holmgren for his help (and building the system in the first place!).
Greywater resources
- Building a biological greywater system at Milkwood Farm
- Water harvesting + reuse – articles on Milkwood.net
- Greywater Action – lots of great resources here
- Oasis Design – amazing greywater section
- Harvesting Rainwater’s greywater section







Thank you for sharing the set up of this simple design. It’s beautiful as well as functional. I have a question though. Do you have to worry about rainwater, drowning the worms, if you happen to get a large downpour. Like in tropical climates. Would a cover be best used, over the worm bed in this case?
because the worm bed drains straight through, and because they’re raised off the bottom of the tub (so no standing water in that tub), the worms can’t drown if they try. All good.
Hi, what do you fill de first tub with?
The first tub is worms + straw
Wish I had the space for something like this – it’s a genius design! And it looks good, too 🙂 Thanks for sharing.
you’re welcome emma 🙂
Hello- Nice article. One question I had is this level of filtering necessary going from a washing machine to trees. I’ve seen that Brad Lancaster sends the washing machine water straight into a mulch basin around fruit trees. Or would you maybe pass through one tub/reed bed first. I know it’s a little different than what your explaining here. Thanks for the help!
As long as the basin is reasonably free draining, then worms can flourish in it and they plus the other microbiology will ‘clean’ /use the water – no problem
Good advice. Thanks again 🙂
yep for trees (especially if the greywater is being delivered to the tree at a point under mulch, this point is important) you could take it straight out of the shower, sink or washing machine and into a mulch basin – depending on your climate, of course – Brad’s often working in drylands, where it’s unlikely the systems will get waterlogged for prolonged periods.
I’m in sandy south Florida so drainage isn’t a problem. I guess you could also divert urine from a compost toilet to that same tree/banana mulch basin along with the shower and washing machine water for a added boost of nutriants? Thanks for the help!
Would the holding tub be likely to become a breeding area for mosquitoes?
How does the water get from the house to the first tub? Is that plumbed in when the house was built or can it be retrofitted?
this system was setup during the house build, but it could be retrofitted in most (not all) homes if you can access the greywater pipes under the floor…
I love it when you guys post these kinds of articles.
Perhaps we’re a little naughtier than you but our cooking more than occasionally ends with a bit of grease on the cookware and dishes. How do you find this system handles the fats/grease coming from the kitchen sink?
Nat we cook with plenty of fats, so did the last resident of this house, and the system is doing fine.
Hoping to build a similar system, but nervous about the holding tank and mosquitos? Has this been a problem for you?
Also, do the worms require any extra food?
Hi, great system! Thanks for the article I’m going to be building a similar system and wondering what plumbing connections did you use to connect the pvc drain pipe to the tub drain hole? Thanks!
Can’t remember the specifics sorry but it was pretty basic 🙂
Hi, I am very keen to create a grey water system at our house – and also composting toilets – as our inherited wastewater system is really disfunctional, has never worked well, currently leaks raw sewage and wastes litres of water every day. All the grey water systems I have looked at are for small dwellings with not a lot of people. We are a 5 person household (3 teens!) and so my question is – how can you scale up the systems made for smaller output of waste water to cope with larger quantities? Thanks so much.
Rachel, I hear that great desire of yours, “to do things better.”
Have you looked at The Humanure Handbook? Getting to read it right the way through can be very inspiring and could lead to solution which might suit your particular circumstances.
On the topic of learning to use water carefully, many of us are unaware of how much we use. Thinking of the typical 120-lt wheelie bin, that is how much water which could be used in a ten-minute show (depending on shower fittings of course, but around that amount). Your teenagers might be surprised.
Wishing you success.
Rachel, when we had a lot of people’s poo to deal with, we made these wheelie-bin based systems – https://www.milkwood.net/2010/11/23/the-most-lovable-loo-in-the-west/ – here’s the specifics – https://www.milkwood.net/2011/04/18/compost-toilet-specifics-the-bins/ …. and here’s an urban version – https://goodlifepermaculture.com.au/wheelie-bin-compost-toilet – hope that helps as good thinking options!
Thanks for the article! Could ducks be incorporated into the final tub?
I dont see why not 🙂 you’d want to keep them out of the 2nd tub tho so they don’t eat the plants in there…. easy enough to do though.
Thanks!! Would we would need to put something in place so it could be emptied more often or the like?
Just a quick question regarding tub 3? on a rural property would this be a thing that could attract snakes? Just thinking of using this system on our property but want to ensure the kids (and anyone really) will be safe if its around the house?
Thanks for these explanations and instructions. We intend to divert the water used in bathroom only (shower ,bathtub, sink) – not kitchen sink, not washing machine. We do not have space for 3 bathtubs, 1 or – with difficulties 2 – only. Do we need first and third tub ? Your advice is appreciated.
Hey Martin – if it’s just bathroom only, yep I rekon you could get away with 2 tubs as there won’t be as much grease and goop (unlike kitchen sink) coming out of those vessels… main thing that would be good to keep in mind is that you *will* still have an amount of goop (hair, skin cells etc) coming into that first tub so if you go straight to tub 2, full of gravel and plant roots, do keep in mind that that goop will build up over time, so you will probably need to clean out that top… Read more »
Real good presentation of greywater treatment. I am always on the lookout for ways to improve/enhance my own system.
Have you considered adding Azolla to your final holding tank? Or duckweed (Lemna minor) to the final holding tank. You can the have the valuable biproduct of a nitrogen-rich, slow-release fertilizer and a feed suppliment for chooks. Depending on climate and temperature, it can be harvested every few days.
Wishing you well with ongoing success.
Heya, we wouldnt personally add azolla to this system bc there’s a seasonal creek nearby, and we don’t want to possibly spread it in the (very unlikely chance of) some sort of on-flow. Do love azolla in tis right context, though! And if you’re not in the context this was built in, could be a great addition to the final bathtub 🙂
Hello, we are looking at implementing something like this for our bathroom and laundry, the space we have for the bathtubs is quite close to the bathroom. How has the plants and biology responded to hot water coming in, or do you pass it through something to cool it before it enters the bathtub system? Thanks!
Hey Vanessa – in our experience, it’s fine to run a bathfull of water into this type of system – basically the worms retreat from the area directly where the water is coming in, and it all works out 🙂
Hi there, just discovered that the place we recently bought doesn’t have a grey water tank – so I’m thinking of taking advantage of this and setting something up like how you’ve described – thank you for all the great info and lots of diagrams!! I’m also thinking beyond the current rainy seasons and trying to set up my garden so it’s sustainable when there is less water around (I’m in SE QLD). I’m wondering whether the water in the final holding tank would be suitable for transferring to a larger tank and using to top water plants? Or is… Read more »
Heya Miriam – getting the final greywater out back into a biological system sooner rather than later is key with this type of system – you don’t want it in a holding tank where it could breed up some serious nasties.
You could look at a float valve on the final tub, which pumps via a little solar pump directly up to an open ‘header’ vessel (not a closed tank) up by your garden? Then once that small open vessel is full, it should spill regularly into your garden…
Hi
I love this design. My husband has a couple of questions though.
Was this a retrofit or was it built with the house?
Is the house lowset?
And is the block sloping?
Thank you
Hi Lynda – yes it was built with the house, and yes that part of the block slopes downwards –
Can I get an update on your filter system? Like, is it still working well? Unforseen maintenance? Myths, assumptions, mistakes, upgrades, etc? I’ve found a few articles about building them, none so far about long-term use.
When we lived with this system it was about 5 years old, and we left when it was about 8 years old – and it worked great during out time there – the other house on the property had the same system, that had been running for nearly 40 years, and it was working ok?
Thank you so much for the reply. I’ve already built a few projects around the homestead the last three years. I’m starting to learn that some articles/tips appear to be copied ideas that have not been tested and true. I didn’t believe your article was one, which is why I asked. For instances, I’ve never built a successful rocket stove. Either I’m dumb, or it does not work as advertised. Eh. Oh well. 🙂
hey no worries – and yep, re-gurgitated info that doesnt actually bear out is A Thing 🙂 – Rocket stoves – the little can ones work really well, in my experience? And we’ve often built the quick-brick style to heat up large volumes of water quickly, so they can be great. And the rocket stove we built for our shower block was super effective (could have been better, but still – worked great) https://www.milkwood.net/2011/10/28/rocket-stove-water-heater-redux/
Thanks for the great article! I plan on making something similar for a studio im building. The issue i have is that the outflow is downhill from our orchard where id like the water to go. So the plan is to have a holding pond with a pump that i can use to irrigate the orchard or paddocks. My question is, i also have ducks living near by and ive been struggled to use their pond water effectively in the garden also due to lack of slope. Do you think it would work to integrate these two systems by running… Read more »
Hey Paul – yep that could work – you’ll need to have a settling pond at the lower end fo the system, and good filters that get regularly cleaned on your pump though!
Thanks Kirsten
Ive just found a old sump pump to do up and and will test it out with some of my ducks poop water. Looking forward to effective using in the orchard.